

This page covers permissions and role management. The separate approve/decline flow for publishing agents and campaigns is documented in Publish Approval Workflow.
How it works
- Every new team gets two protected default roles automatically: admin and member.
- Each role holds a subset of the permission catalog — anyone with the Manage Settings permission can create additional custom roles with any name and any combination of permissions.
- Members are added to the team by email invite or, on teams with direct-add enabled, immediately by email lookup — each is assigned exactly one role.
- Permission checks run server-side, on the specific action being taken, not just as UI visibility rules.
- Members can also be assigned to Groups, a separate mechanism used only for routing conversations — groups carry no permissions.
Default roles
Every team is provisioned with two roles it cannot delete or rename away:
These are the current defaults for newly provisioned teams. Existing teams can have different grants; check Settings → Roles for your workspace. The default member role includes analytics and automations, but excludes Manage Settings, View PII, Publish Agents, Publish Campaigns, Publish Dashboards, View Own Calls, Review Call Quality, and Manage Call Quality. An administrator can grant additional permissions through a custom role.
The admin and member rows in the roles table have their delete action disabled — the server also rejects the request with
"Cannot delete admin or member roles." if it’s attempted directly.
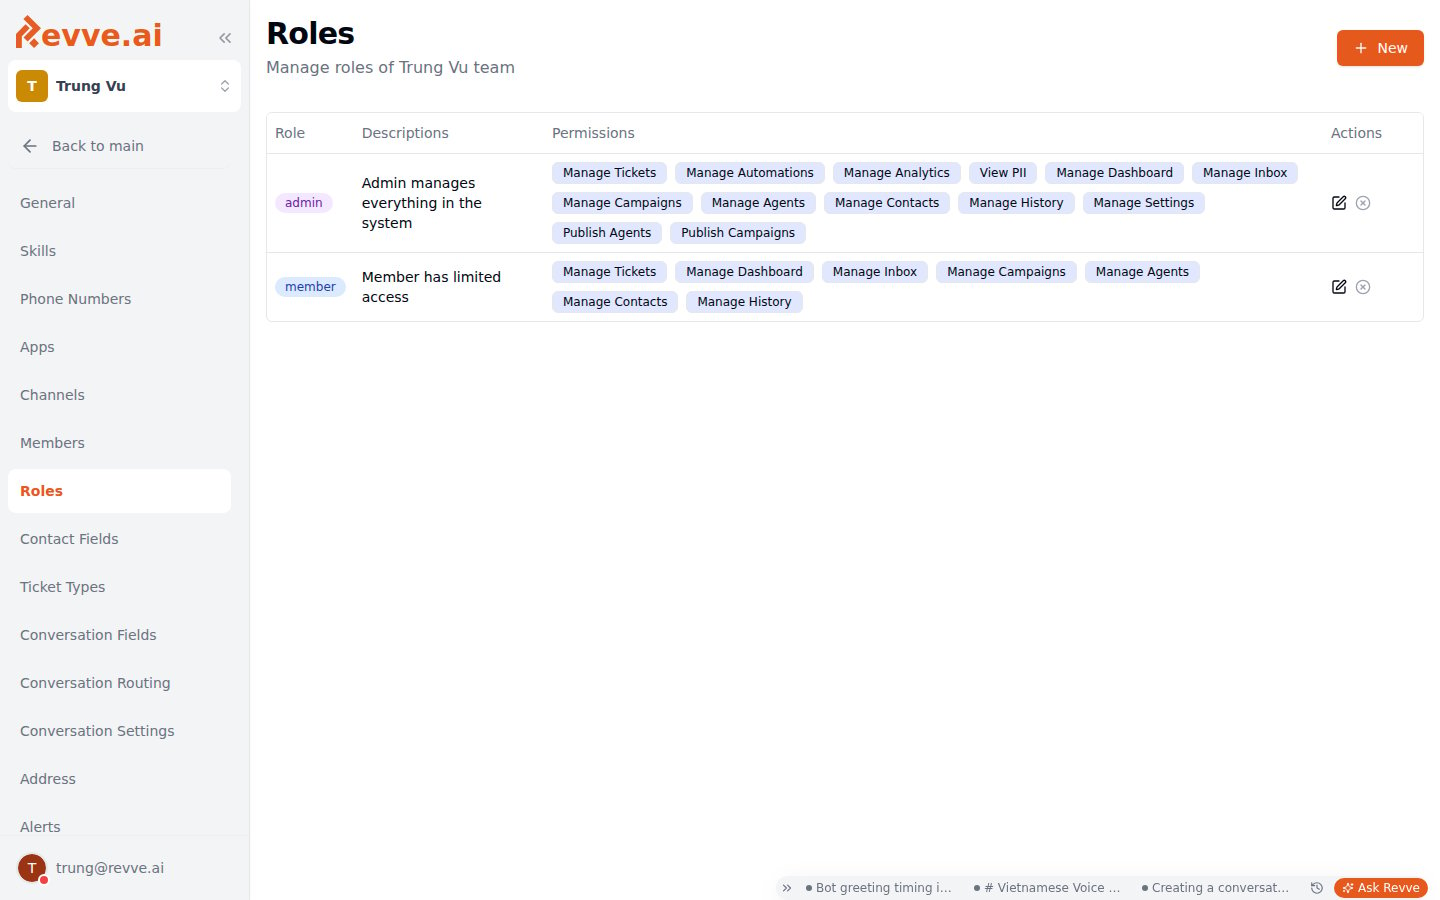
The permission catalog
Every role — default or custom — is defined as some subset of this catalog.Members who hold Manage Campaigns or Manage Agents but not Publish Campaigns / Publish Agents can still build and edit drafts — they just can’t make the draft live themselves. Their only path to production is submitting the draft for review, per Publish Approval Workflow. This is the mechanic behind the review step in Campaign Overview: “Team members without publish permission submit drafts for review; a reviewer approves or declines.” The draft/publish mechanics themselves — independent of who’s allowed to press the button — follow the same pattern across all three resource types but are implemented and documented separately: Publishing & Versioning for chat agents, Campaign Versioning for campaigns, and Voice Agent Versioning for voice agents.
Custom roles
Any member holding Manage Settings can create a role with an arbitrary name, description, and any combination of the permissions above. To create one, go to Settings → Roles and click New. This opens the Add Role dialog:- Name — free text, must be unique within the team.
- Description — free text.
- Permissions — a checkbox grid, one box per permission; check any combination.
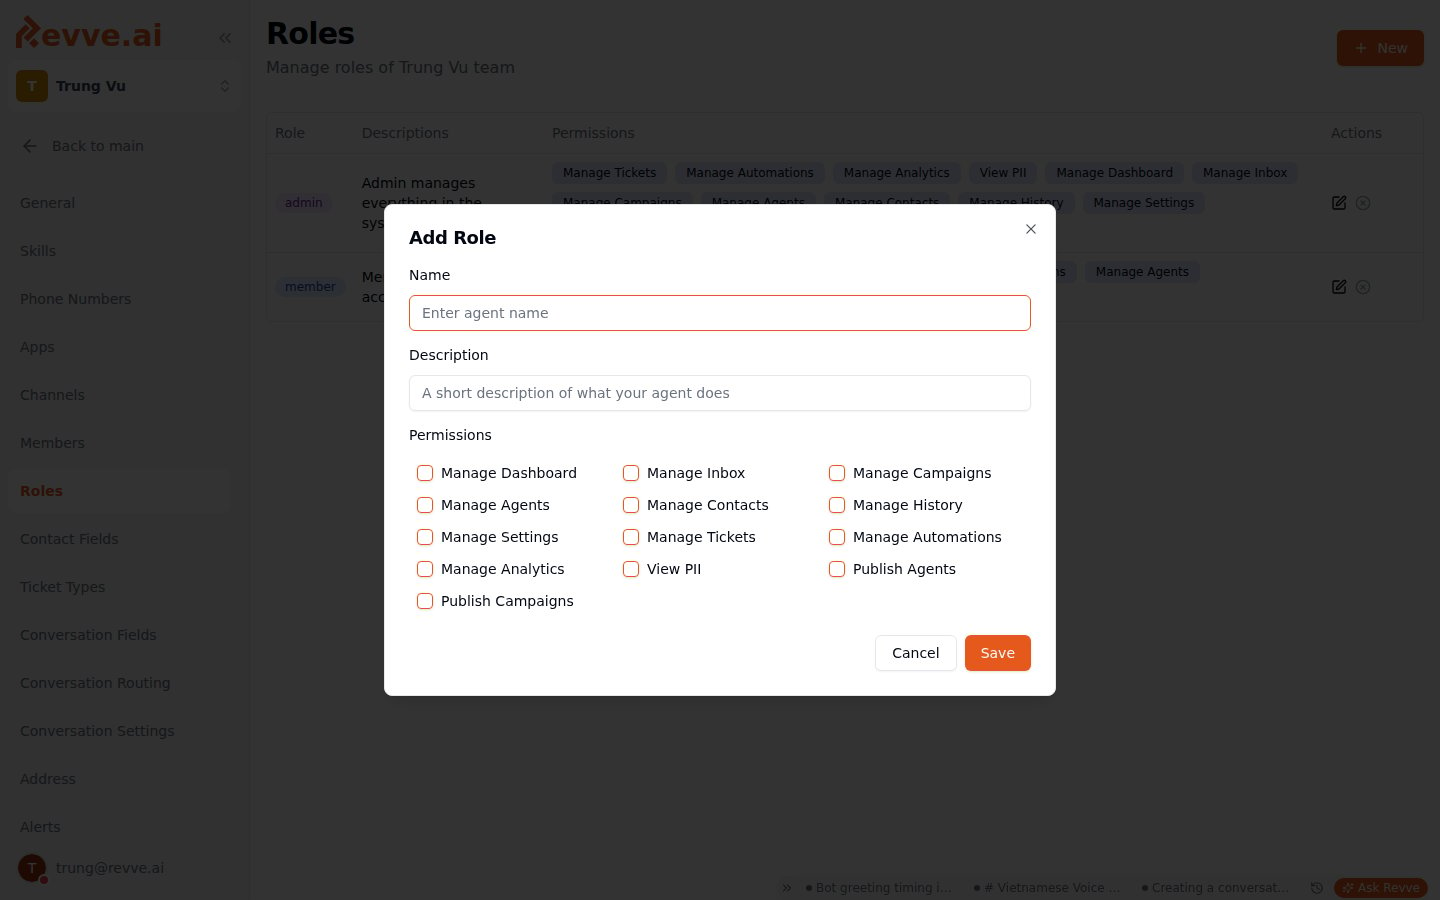
{role name}.” Members currently holding a deleted role lose its permissions immediately.
How permissions are enforced
This matters for a security review, so it’s worth being precise about the mechanism rather than just the labels. Two separate checks are involved in every authorized request:- Team membership. Every route and service-layer query that bypasses row-level security is gated by a team-membership check — it confirms the requesting user belongs to the team, and nothing more. This is the baseline authorization gate; it does not know or care what role or permissions the user has.
- Permission grant. Routes that guard a specific sensitive action separately check whether the user’s current role grants the named permission, via a real-time database join across the team’s roles, role-permission assignments, and the permission catalog. For example, the endpoints that approve or decline a publish request each check for Publish Campaigns (or Publish Agents) before proceeding, and return HTTP 403 with
"You do not have permission to approve publish requests"(or"...decline...") if the check fails.
Members
Settings → Members lists everyone on the team and lets admins manage who’s on it and what role they hold.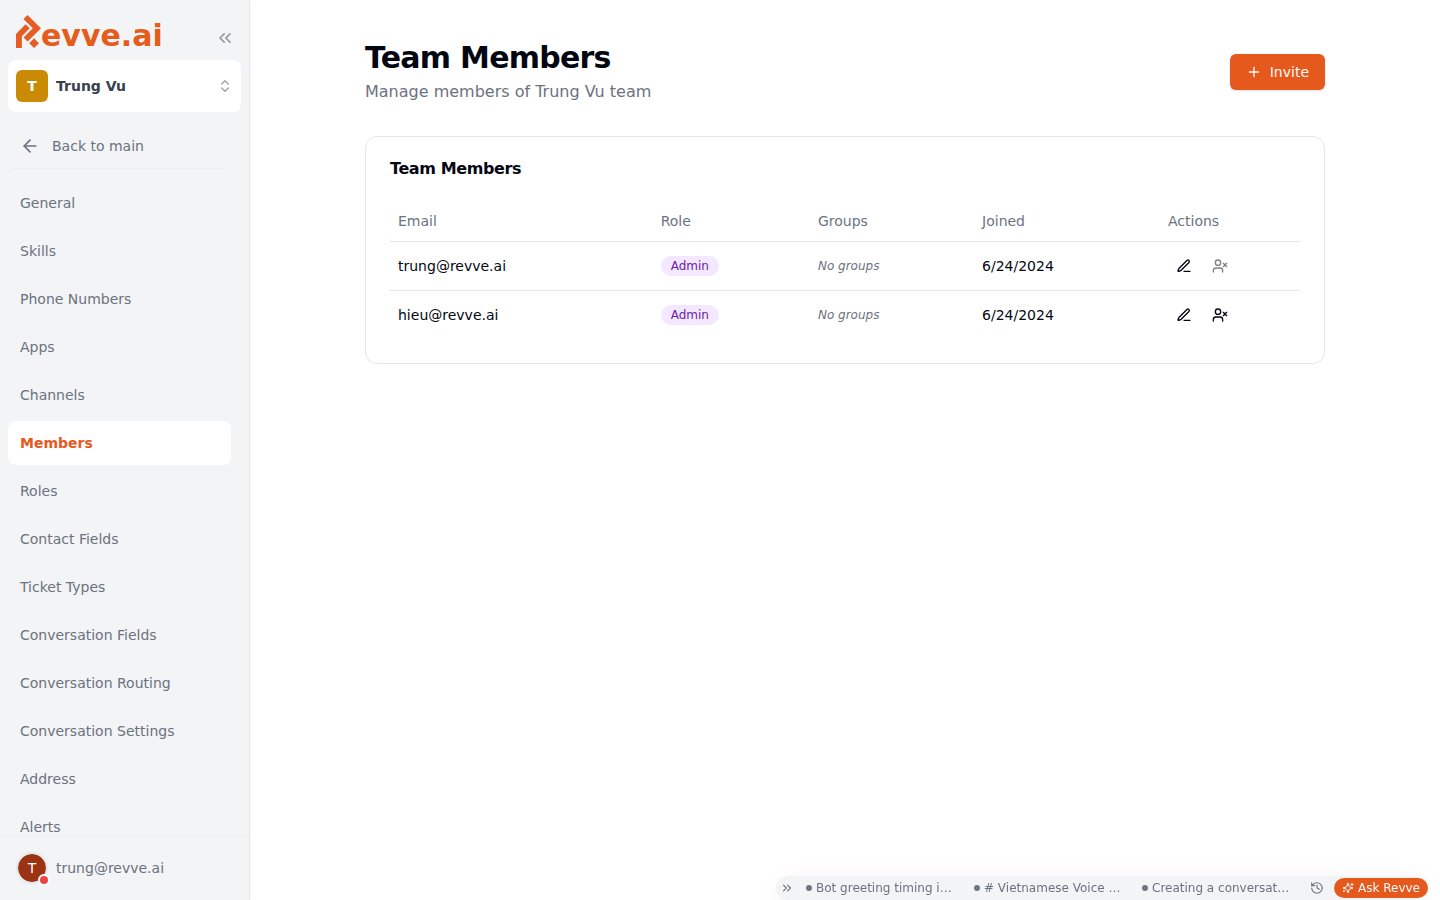
Adding a member: invite vs. direct add
There are two distinct ways to get someone onto the team, and only admins can do either: Email invite (the default, always available): collects Email and Role. Submitting creates a pending invitation valid for 48 hours and sends the invitee an email with an accept link. The person doesn’t join the team until they click through and accept — until then, they show up in Pending Invitations, not Team Members. Direct add (only available on teams with direct-add mode enabled): collects Email, Role, and optionally Group Assignments. Submitting looks up an existing Supabase-auth user by that email and adds them to the team immediately — no invitation email, no accept step. Direct add does not create a new user account: the person must already have a Revve account under that exact email, or the lookup fails. The header button reflects which mode is active — it reads Add Member when direct-add is on, or Invite otherwise. Both open the same dialog shape, titled Add Team Member or Invite Team Member respectively; the footer button reads Add Member or Send (with loading states “Adding…” / “Sending…”).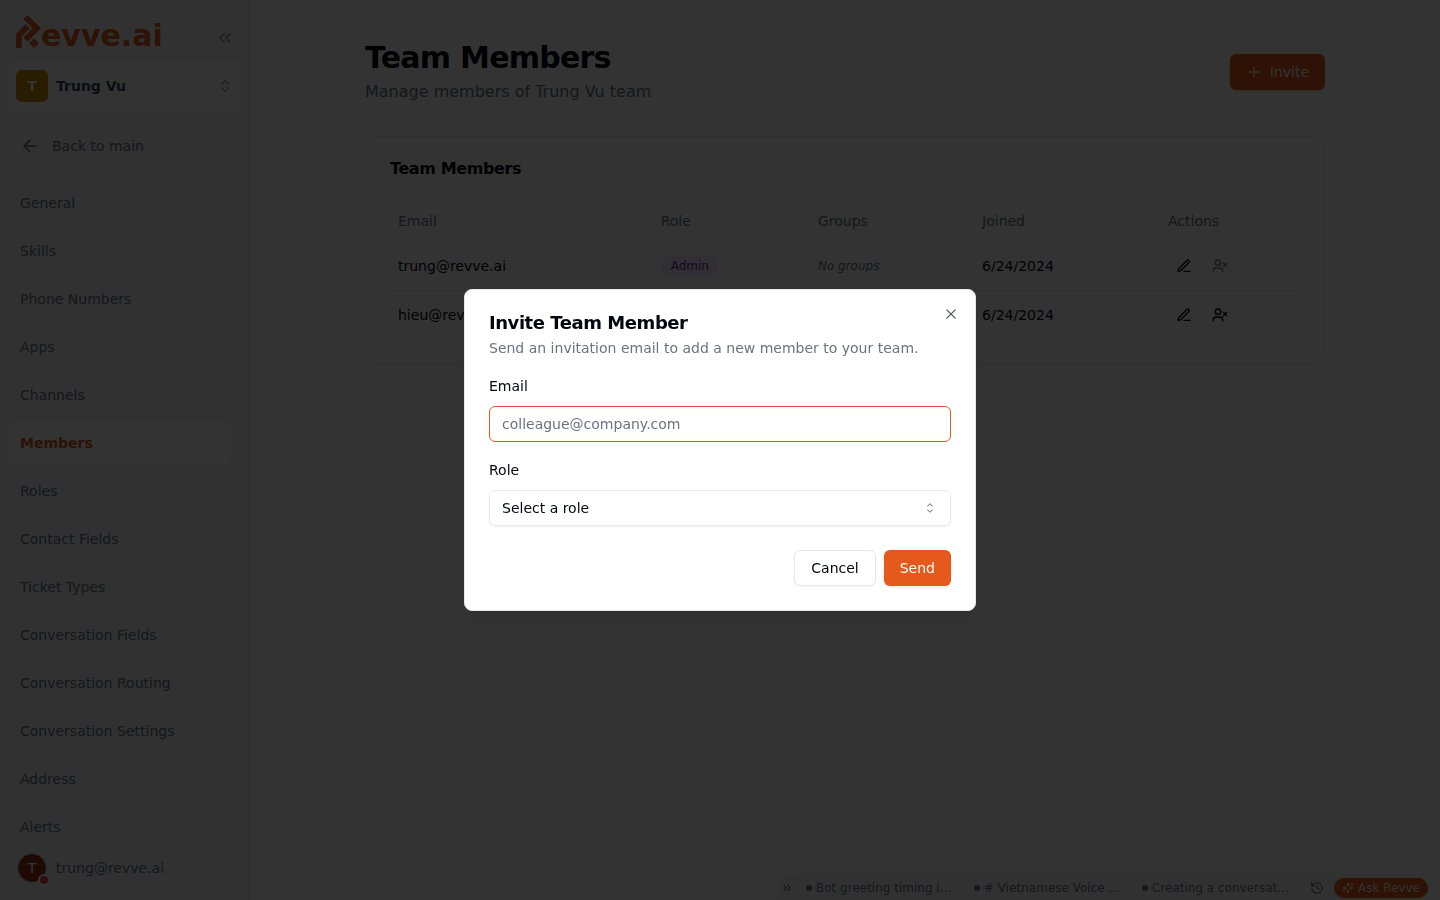
Editing and removing members
Clicking a member’s row action opens the Edit member dialog: Role (a dropdown — disabled if the member’s current role isadmin, so you can’t demote an admin from this dialog) and Group Assignments. Save Changes applies the update.
Removing a member opens a Remove Team Member confirmation showing their email and role. The dialog blocks the removal, with a warning banner, if the member is the team’s last admin — a team can never be left without at least one admin through this flow.
Groups: routing, not access control
Groups are a separate, lightweight concept from roles — don’t conflate the two:- A member’s role governs what they’re allowed to do (the permission catalog above).
- A member’s groups govern which conversations get routed to them. Groups carry no permissions of their own and aren’t sub-teams.
What’s Next
- Publish Approval Workflow — how the Publish Agents / Publish Campaigns permissions gate requesting, approving, declining, and canceling a publish.
- Publishing & Versioning — the draft/publish mechanics that publish permissions and approvals sit on top of.