

Step 1: Create the campaign
Go to Campaigns in the left sidebar and click New Campaign. Give it a Name (max 50 characters) and a short Description, then click Create.Step 2: Start editing
You land on the Setup tab in read-only mode. Click Start Editing in the top banner to open a working draft: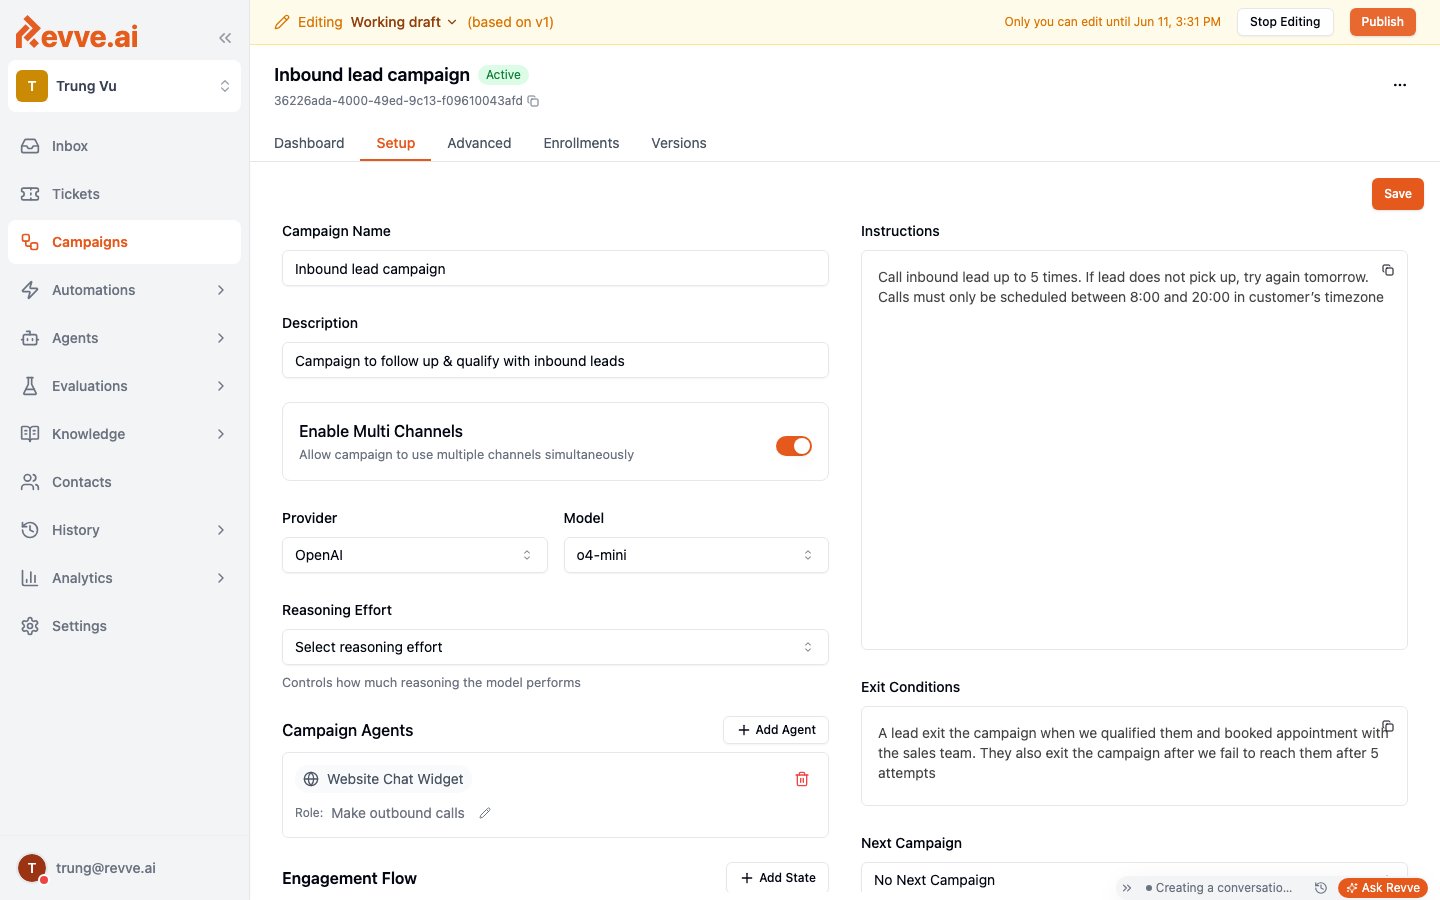
Only one person edits at a time. Starting to edit locks the draft for you (the banner shows until when). Teammates see “Locked for edit” until you click Stop Editing or the lock expires. The live campaign — if already published — keeps running untouched while you edit.
Step 3: Configure the Setup tab
Work down the form:Campaign Agents
Click + Add Agent and attach each agent the campaign should act through. For each one, set its Role — what this agent’s job is within the campaign (e.g. “Make outbound qualification calls”). The agent’s channel determines what the campaign can do: a voice agent enables phone calls, an SMS chat agent enables texting, and so on.Engagement Flow
Define the states a contact moves through with + Add State. Keep it simple — three to five states is typical:Instructions
Plain-language rules for how the AI runs the campaign. Be concrete about attempts, timing, and tone:Call inbound leads up to 5 times. If the lead does not pick up, try again tomorrow. Calls must only be scheduled between 8:00 and 20:00 in the customer’s timezone.
Exit Conditions
When is a contact done? Cover both success and failure:A lead exits the campaign when we qualified them and booked an appointment with the sales team. They also exit after we fail to reach them after 5 attempts.
Next Campaign (optional)
Send exiting contacts straight into another campaign — e.g. unreached leads into a slower nurture campaign.Step 4: Publish
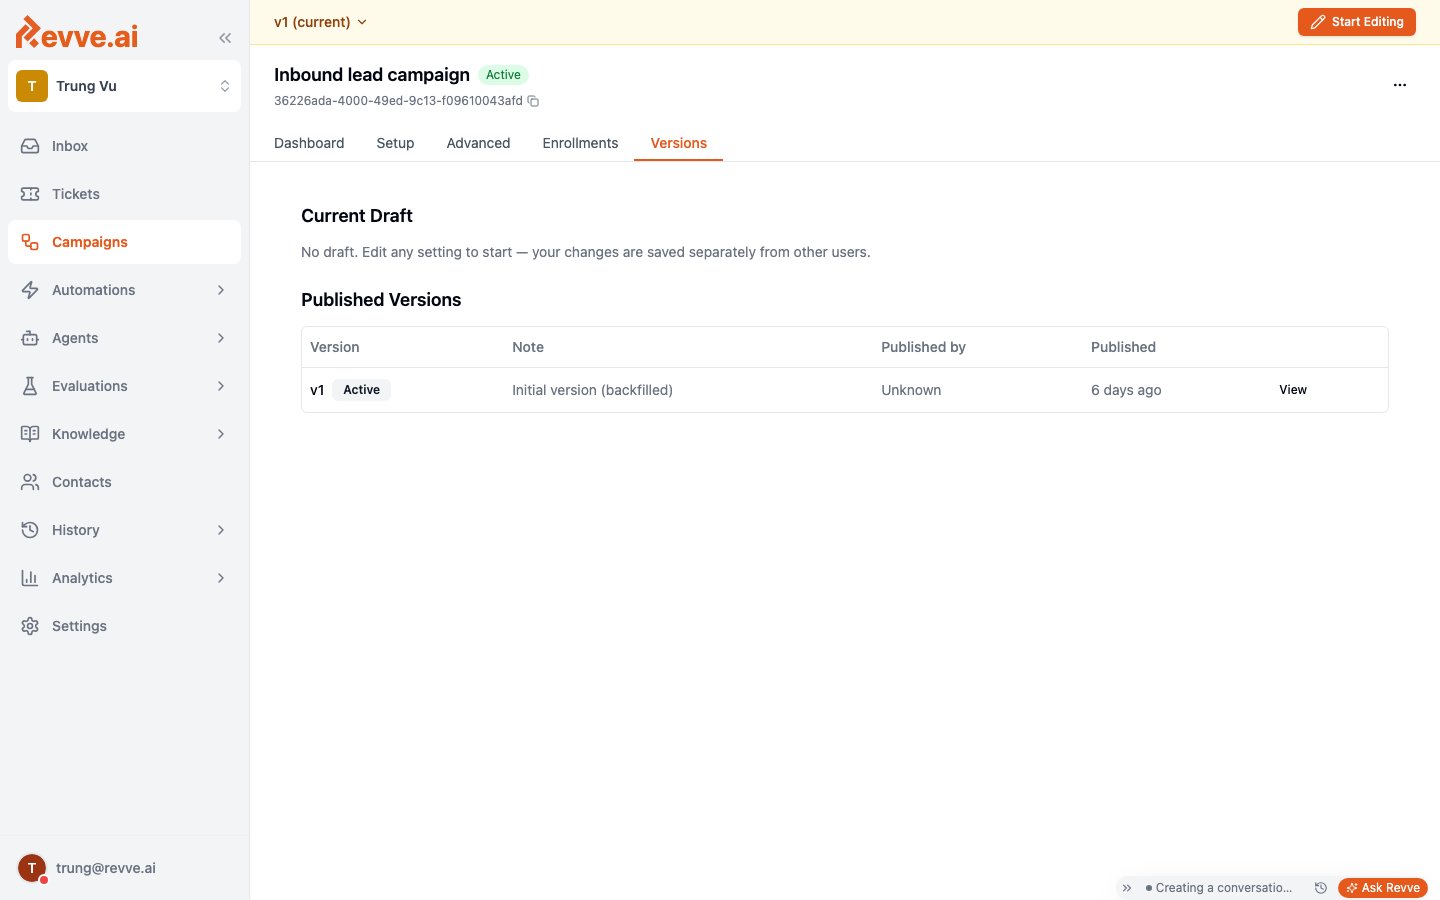
Campaign changes only take effect when published. From the draft banner:- Publish (if you have the Publish Campaigns permission) — review the change summary, optionally add a publish note, and confirm.
- Submit for Review (if you don’t) — pick reviewers, add a description, and submit. A reviewer approves (which publishes) or declines (your draft stays for rework).
- Unchecked (default): contacts already enrolled finish on the version they started with; only new enrollments get the new version. The safe choice.
- Checked: everyone moves to the new version immediately. Use when you’re fixing something wrong, not just improving wording.
Step 5: Enroll contacts
Open the Enrollments tab and click + Enroll: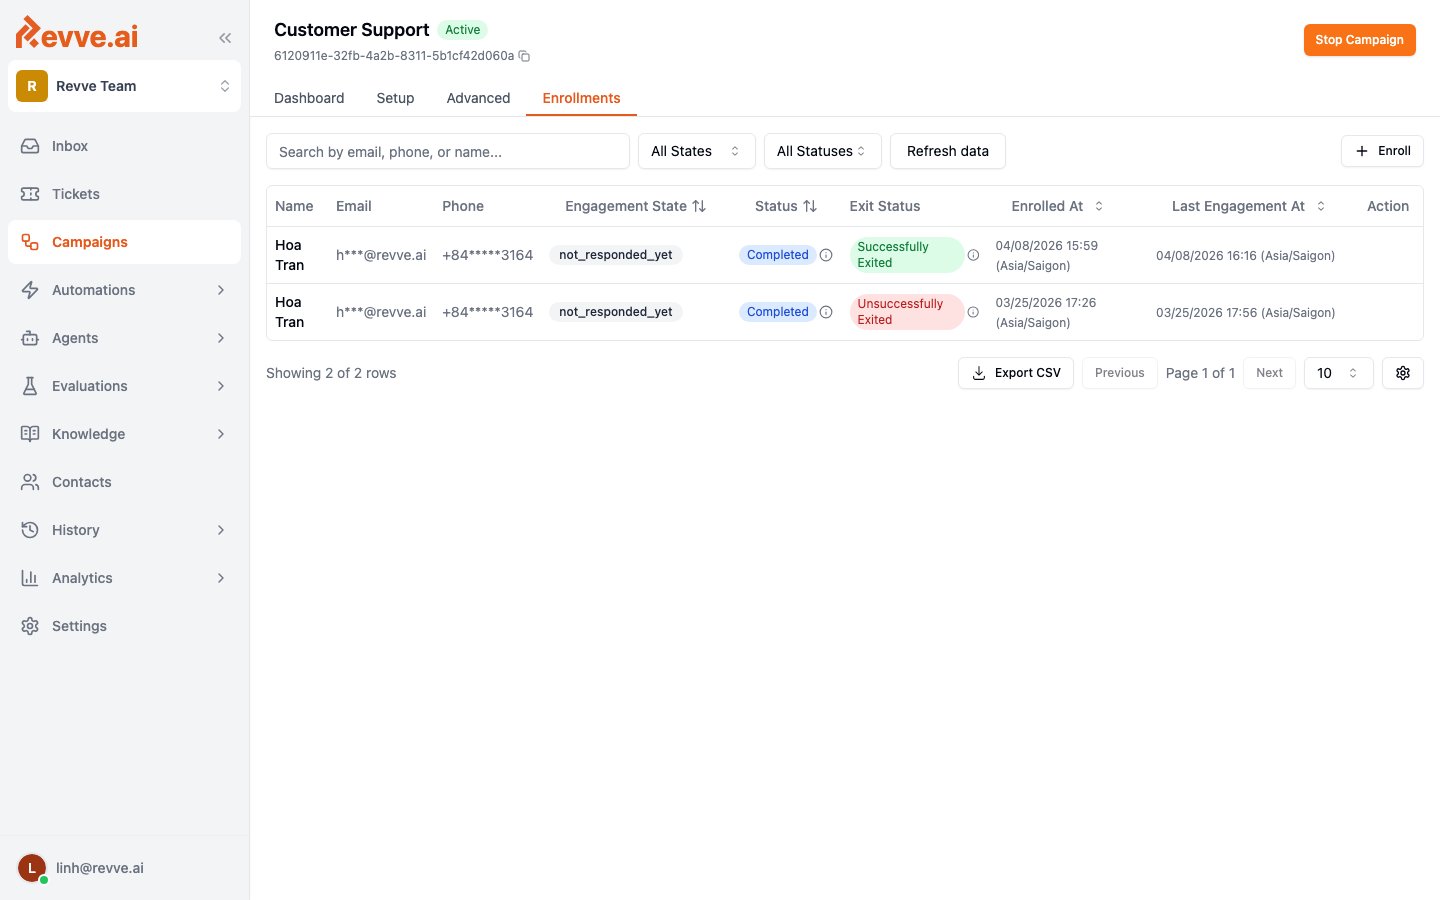
- Immediate — everyone enters the campaign now.
- Scheduled — staggered batches (e.g. 20 contacts per 24 hours). Use this for large lists so your agents — and your audience — aren’t hit all at once.
200 with an enrollmentId, or 409 if the contact is already enrolled. API keys live in Settings.
If the contact doesn’t exist in Revve yet — e.g. it’s coming straight from your core system or CRM — use contact-enrollments instead, which creates the contact and enrolls it in one call:
phoneNumber and teamId are required; campaignId is optional (omit it to just create/update the contact without enrolling). Returns 200 with a contactId.
Managing enrollments
Once contacts are enrolled, the same Enrollments table (shown above) is where you manage them while they’re in flight — per-row actions, filters, and CSV export. Row actions. Each row’s Action column shows buttons only while the enrollment is active or paused — they disappear once it’s completed:- Engage opens a Create New Engagement dialog. This doesn’t trigger “the AI’s next move” — it’s a manual form for creating one specific outreach action on this one enrollment. Pick an agent, a channel (phone call, SMS, email, or WhatsApp), execution timing (immediate, or scheduled with a time and a response deadline), and channel-specific content (a template, or a subject and message). On submit, a paused enrollment reactivates to active; an immediate action runs right away, a scheduled one is queued for its time. Use it when a rep wants to personally nudge one lead outside the campaign’s normal cadence.
- Exit opens an Exit Campaign dialog and is styled as a destructive action. It requires an Exit Status (Successfully exit or Non-Successfully exit) and a Reason (free text, at least 10 characters). Clicking Confirm Exit is the confirmation — there’s no further “are you sure” step. It takes effect immediately: the enrollment moves to completed, the exit type and reason are recorded, and any other pending actions for that enrollment are cancelled. Treat Exit as final, not a draft — there’s no undo for it in the UI.
Filters, sort, pagination, and column visibility are all reflected in the URL, so a filtered view is a link you can share with a teammate as-is.
CSV export. The Export CSV button offers two options:
- Export Current Page — just the rows currently displayed.
- Export All Data — every row matching the active filters, not the whole table.
Step 6: Monitor
The Dashboard tab answers “is it working?” at a glance — total, active, and completed leads, average time in campaign, and breakdowns by status, engagement state, and exit outcome, plus per-channel performance: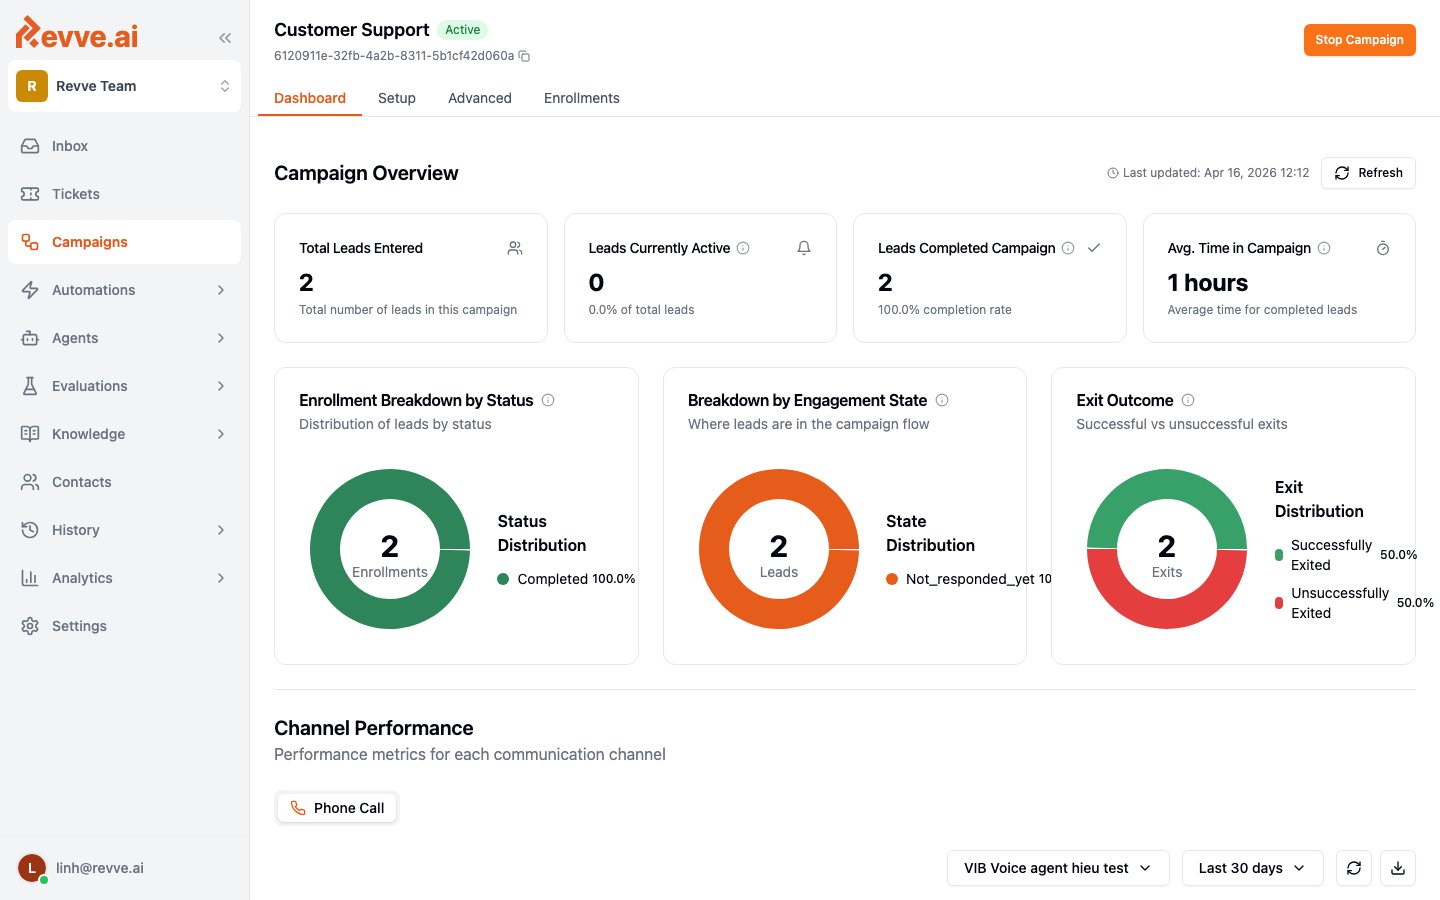
Pre-launch checklist
- Agents attached are published and tested (voice agents: make a Preview call).
- Instructions state max attempts and allowed calling hours.
- Exit conditions cover failure (“after N attempts”), not just success.
- You enrolled yourself first and the experience felt right.
- Large list? Enrollment is Scheduled, not Immediate.
- Numbers on your team’s Do Not Call List don’t need to be filtered out of your CSV by hand — a matching call step is skipped automatically.
What’s Next
- What Is a Campaign? — concepts and use-case patterns.
- Voice Agent Settings — tune voicemail and retry behavior for calling campaigns.
- Build a Payment Reminder Campaign — a full voice-then-SMS recipe applying these steps to a concrete scenario.