

You need the Manage Automations permission to create or edit rules. See Roles and Permissions.
Step 1: Create the rule
Go to Automations → Rules in the sidebar and click Create Rule (top-right). There’s no dialog — Revve immediately creates a rule named “New Automation Rule” with the Call Analyzed trigger, sets it to Inactive, and opens it in the builder: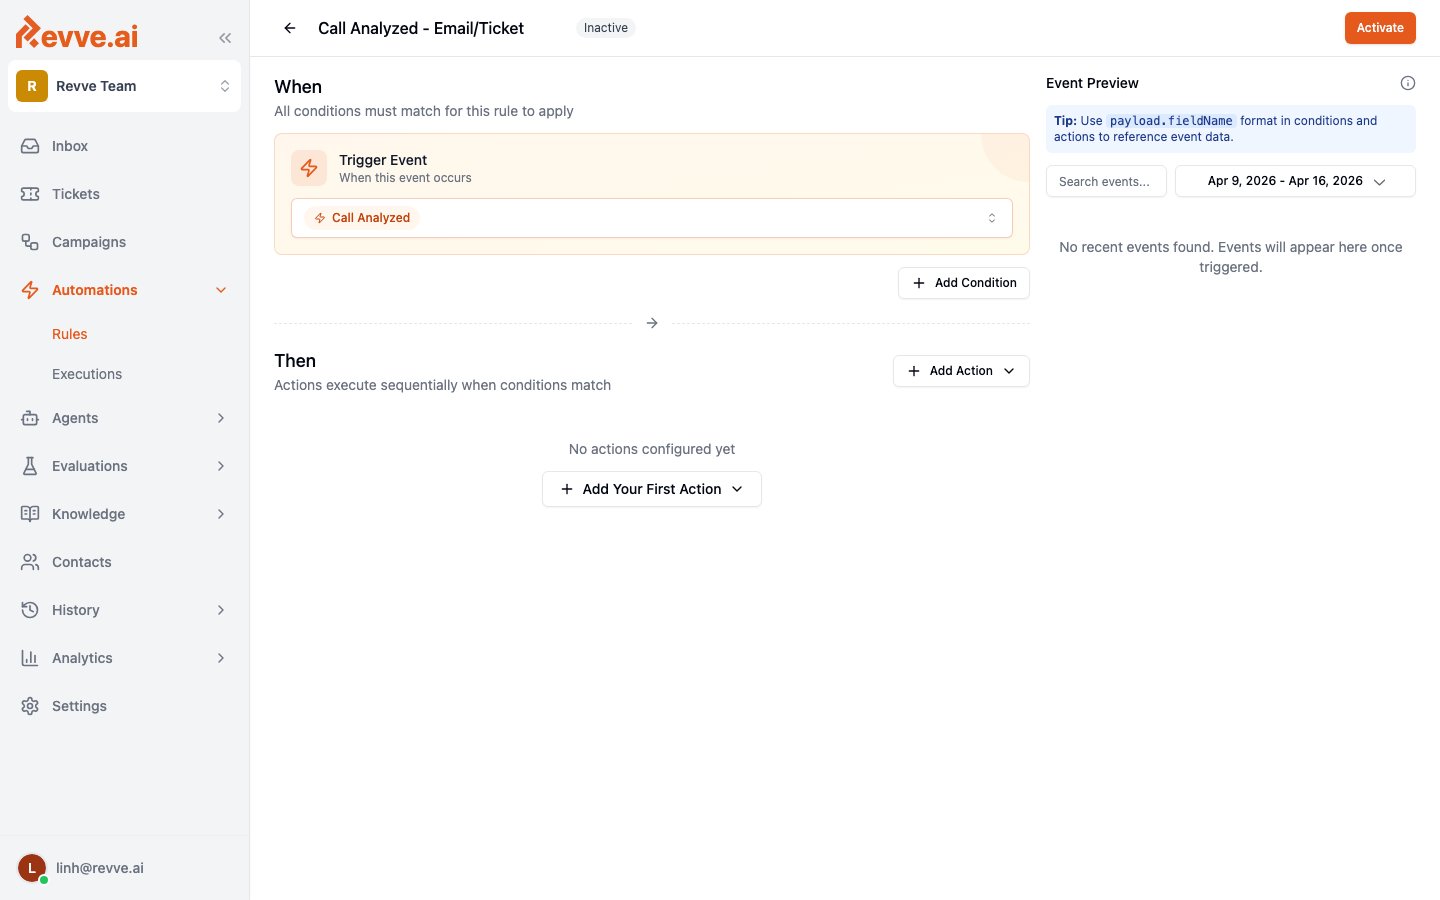
Step 2: Choose the trigger event
In the When section, open the Trigger Event dropdown and pick the event that should start this rule. There are 11 event types — call and chat analysis, contact and lead changes, campaign enrollment lifecycle, and action outcomes. The full catalog with each event’s payload fields is on the overview page. Changing the trigger shows an “Event type updated” toast. Pick the trigger first: it determines which payload fields your conditions and action templates can reference.Step 3: Add conditions
Conditions are optional filters. With zero conditions the rule fires on every event of the trigger type — fine for low-volume events, risky for chatty ones. Click + Add Condition to add a row with three parts:- Field path — dot notation starting with
payload., e.g.payload.call.successful. Autocomplete suggests paths from the sample event selected in the Event Preview panel (see the next step). - Operator — see the table below.
- Value — auto-coerced to the field’s type. If the sample event shows the field is boolean, you get a true/false picker instead of free text.
Deleting a condition asks for confirmation (“This action cannot be undone.”).
Step 4: Find field paths with the Event Preview panel
The panel on the right lists recent real events of your trigger type (last 7 days by default), searchable, with Structured and Raw payload views. This is how you discover field paths without guessing: trigger a real event — make a test call, send a test chat — and it appears here. The selected event then powers autocomplete for both condition field paths and action templates. Until something fires, the panel shows “No recent events found. Events will appear here once triggered.” As the panel’s tip says, reference event data with thepayload.fieldName format in conditions and actions.
Step 5: Add actions
In the Then section, click + Add Your First Action (later just Add Action) and pick one of the 5 action types. Actions run sequentially in the order shown, numbered #1, #2, and so on. Each card has Edit (pencil) and Delete buttons; API Call cards also get a Test button. Every text input in these dialogs accepts template syntax like{{payload.contact.email}}, so actions can use data from the event that triggered the rule.
API Call
The Configure API Call dialog sends an HTTP request to any allowlisted endpoint:- Method — pills for GET/POST/PUT/PATCH/DELETE (default POST).
- URL — e.g.
https://api.example.com/endpoint; use{{payload.field}}to insert event data dynamically. The URL must pass your team’s domain allowlist or the action fails. - Headers — key/value rows. Content-Type is set automatically.
- Query Parameters — shown only for GET.
- Request Body — shown for POST/PUT/PATCH, with a Key-Value / Raw toggle. Raw content is template-substituted, then sent as JSON (or as raw text if the result isn’t valid JSON).
- Retry on Failure — off by default. When on, set Max attempts 1–5 (default 3); retries run 10 seconds apart. Requests time out after 30 seconds.
Update Contact Field
The Update Contact Field dialog writes event data back onto the contact:- Contact ID — defaults to
{{payload.contact.id}}. - Field rows (repeatable, at least one) — a searchable Select field… picker covering standard fields (name, email, phone) plus your team’s custom contact fields, paired with a template value like
{{payload.call.custom_analysis_data.field_name}}.
Send Email
The Configure Send Email dialog:- To — comma-separate multiple recipients; templates work, e.g.
{{payload.contact.email}}. - Subject and Email Body — the body is HTML with an Edit/Preview toggle; Preview resolves templates against the sample event selected in the Event Preview panel.
- Advanced Options — Cc and Bcc.
Create Ticket
The Configure Create Ticket dialog:- Ticket Type — from Settings → Ticket Types. If you have none, the dialog says “No active ticket types found. Create one in Settings > Ticket Types.”
- Title (templated) and optional Description.
- Contact ID — defaults to
{{payload.contact.id}}. - Event-specific link fields — Thread ID for Chat Analyzed triggers, Call Request ID for Call Analyzed.
- Assigned To — “Leave unassigned to auto-assign to an available agent based on routing rules.”
- The ticket type’s custom fields, with required ones validated.
Enroll in Campaign
The Configure Enroll in Campaign dialog: pick a Campaign (active campaigns only) and a Contact ID (defaults to the contact from the event payload). If the contact is already enrolled, the action still counts as a success. See Creating a Campaign for setting up the campaign side.Some rules also show read-only managed action cards — Salesforce or HubSpot sync steps provisioned by CRM apps. You can’t add or edit those in the builder.
Template syntax
Templates let conditions stay simple while actions carry the event’s data. Every field below also autocompletes in the editor, and a Format button indents conditional blocks.- Insert event data —
{{payload.path.to.field}}, dot notation all the way down. - Fallbacks —
{{payload.field || fallback}}uses the fallback when the field is missing. - Conditionals — wrap content in
{{#if payload.field}}...{{/if}}. Negate with{{#if !payload.field}}, compare with{{#if payload.field = 'value'}}or!=. Blocks nest. - Team secrets —
{{secrets.NAME}}for API keys and tokens, resolved in API Call actions only (URL, headers, query parameters, body). Secrets autocomplete in every dialog, but other action types don’t substitute them — in an email body,{{secrets.NAME}}renders empty. Secret values are redacted from execution logs.
Chaining actions
Name an API Call action, then reference its response in any later action as{{actions.actionName.body.field}}. Names are camelCased: an action named “Get Auth Token” becomes actions.getAuthToken. You can also reference by position: {{actions[0].body.field}}. Each action exposes status, headers, body, and success. If the referenced action failed, the action referencing it is skipped.
Step 6: Test, then activate
Before going live:- Click Test on each API Call card to fire the request against the selected sample event.
- Click Test Email in Send Email dialogs to check rendering with real payload data.
Step 7: Monitor executions
Automations → Executions lists every run with its status (Success / Failed / Skipped), per-action results, and durations. Click a row to open the Execution Detail panel with each action’s request/response data and the raw event payload — your first stop when a rule misbehaves.Rules can’t be deleted. When you no longer want one, Deactivate it.
Worked example: ticket + email on failed calls
- Create a rule named “Failed call follow-up”; keep the Call Analyzed trigger.
- Add one condition:
payload.call.successfulEqualsfalse. - Add a Create Ticket action — pick your support ticket type, write a templated Title, leave Contact ID at
{{payload.contact.id}}and Assigned To unassigned for auto-routing. - Add a Send Email action — To your team alias (or
{{payload.contact.email}}to reach the contact), plus a templated Subject and Body. Use Event Preview autocomplete to pull the exact call fields you want into the body. - Make a test call that fails the success criteria, check the event in Event Preview, Test Email, then Activate.
What’s Next
- Automation Rules overview — the full event catalog with payload fields, and how execution works under the hood.
- Creating a Campaign — build the campaign your Enroll in Campaign actions feed into.