> ## Documentation Index
> Fetch the complete documentation index at: https://www.revve.ai/docs/llms.txt
> Use this file to discover all available pages before exploring further.
# Connecting Calendly
> For workspace admins: install the Calendly app via OAuth, set up scheduling profiles, and make your calendars available to chat and voice agents.
This guide connects your Calendly account to Revve so your agents can check real availability, book meetings, and suggest alternative slots when a caller's preferred time is taken. You'll install the app, create at least one scheduling profile, and know where to attach it on the agent side.
You need the **Manage Settings** permission to install apps. For how the Apps page works in general, see the [integrations overview](/docs/integrations/integrations-overview).
## Step 1: Install the Calendly app
Go to **Settings → Apps**, find the **Calendly** card, and click **Install**. You land on the **Calendly Integration Setup** page ("Connect Revve AI with your Calendly account to enable appointment scheduling"), which previews what the connection unlocks under **What you'll get:**
* **Check Availability** — AI agents can check your Calendly availability in real-time.
* **Book Appointments** — automatically book meetings on your Calendly calendar.
* **Near-Slot Suggestions** — when a time is unavailable, suggest alternative slots.
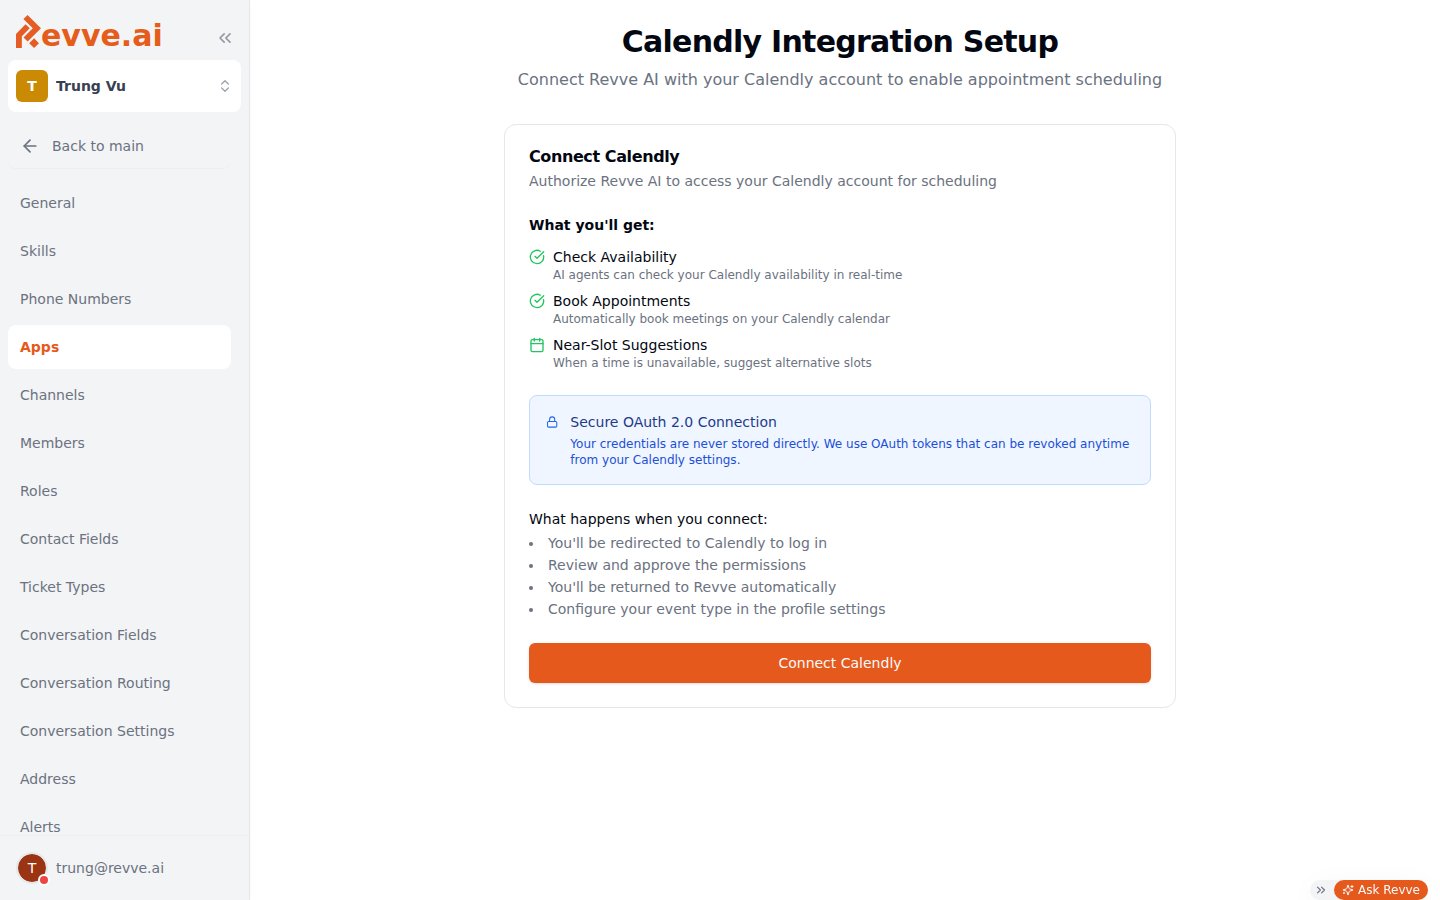 Click **Connect Calendly**. You're redirected to Calendly to log in, review the requested permissions, and approve them. Calendly then returns you to Revve automatically, landing on the Calendly management page.
The connection uses OAuth 2.0 — your Calendly credentials are never stored in Revve. The access token can be revoked anytime from your Calendly settings, which disconnects the integration.
The connection belongs to your team, and a team can connect multiple Calendly accounts. If different reps book on different Calendly accounts, repeat the install for each one and give each its own profile in the next step.
## Step 2: Create a scheduling profile
A profile is what agents actually point at: one connected account plus one booking configuration (event type, length, tracking). Open **Settings → Apps → Calendly → Details** to reach **Calendly Profiles** ("Manage your Calendly scheduling profiles"). Profiles are listed on the left with a **New Profile** button; the form for the selected profile is on the right:
| Field | Default | What to set |
| ------------------------------------- | ---------------------------- | -------------------------------------------------------------------------------------------------------------------------------------------------------------------------- |
| **Alias** (required) | — | A name you'll recognize in agent settings, e.g. "Sales Team Calendar". |
| **Connected Account** | Your Calendly scheduling URL | Read-only — confirms which account this profile books on. |
| **Event Type** (required) | — | Dropdown of your Calendly event types, loaded live from Calendly and shown as "name (duration min)". If the list fails to load, a manual UUID input appears as a fallback. |
| **Event Length (minutes)** (required) | — | 1–1440. Match your event type's duration — this is what the agent offers callers. |
| **Find Slot After (hours)** | 1 | 0–72. Hours from now to start searching for available slots. Raise it (e.g. 24) if your team needs prep time before a meeting; keep it low for same-day booking. |
Click **Save**. To remove a profile, use the trash icon (a confirmation dialog protects against slips). Deleting the last profile leaves a fresh blank one to fill in.
Create one profile per distinct booking scenario — a "Demo (30 min)" profile and a "Support callback (15 min)" profile — rather than one generic profile. Each agent then picks the profile that matches its job, and you can change an event type in one place without touching agents.
### Route each lead to its owner's calendar
If contacts should book with their assigned rep rather than a shared calendar, enable the **Contact Scheduling Link Override** toggle ("When enabled, uses a contact field to override the default scheduling link"). Pick a **Scheduling Link Field** — a contact field that holds each contact's personal Calendly link (you can create a new field inline). At booking time the agent uses the link stored on the contact instead of the profile's event type, so the Event Type and Event Length fields disappear from the form.
The trade-off: the override only works for contacts whose field is populated. Keep a second, non-override profile as the shared fallback for everyone else.
### Tracking Parameters and Pre-fill Questions
Two collapsible sections handle attribution and forms:
* **Tracking Parameters** — UTM Campaign / Source / Medium / Content / Term and Salesforce UUID, stamped onto every booking. Values can be static tags (e.g. `outbound_q1`) or contact variables like `{{companyName}}` for your Calendly reporting.
* **Pre-fill Questions** — answers for the event type's custom questions, filled automatically at booking time (e.g. pre-fill "Phone number" with `{{phoneNumber}}`). If you use the scheduling-link override's manual question editor, the question text must match the event type configuration in Calendly exactly — a typo means the answer is silently skipped.
## Step 3: Point your agents at the profile
The agent-side wiring lives on [Scheduling and booking](/docs/integrations/scheduling-and-booking); the short version:
* **Chat agents** — enable **Schedule Meeting** in Advanced Settings (or add a Schedule Meeting flow node) and pick this Calendly profile in the **Calendar App** selector.
* **Voice agents** — add the **Check Availability** and **Book Appointment** tool presets and pick the profile in each tool's **Calendar** selector. For a complete build, follow the [appointment-booking voice agent guide](/docs/guides/appointment-booking-voice-agent).
* **SMS booking links** — a Calendly-only voice tool can text the caller your scheduling link instead of booking live on the call.
When an agent books a meeting, it's created in Calendly (your event type's own settings control invites and meeting links), recorded on the Revve contact, and can optionally auto-enroll the contact into a follow-up campaign.
The **Event Type** dropdown loads live from Calendly — if you just created or renamed an event type, reload the profiles page to see it. Separately, a daily sync (02:00 UTC, plus once on connect) keeps the scheduling-link lookup cache current — that's what resolves each contact's personal link when you use the **Contact Scheduling Link Override**.
## What's Next
Attach your Calendly profile to chat and voice agents, and configure what happens after a meeting books.
Build a voice agent end to end that checks availability and books on this calendar.
Click **Connect Calendly**. You're redirected to Calendly to log in, review the requested permissions, and approve them. Calendly then returns you to Revve automatically, landing on the Calendly management page.
The connection uses OAuth 2.0 — your Calendly credentials are never stored in Revve. The access token can be revoked anytime from your Calendly settings, which disconnects the integration.
The connection belongs to your team, and a team can connect multiple Calendly accounts. If different reps book on different Calendly accounts, repeat the install for each one and give each its own profile in the next step.
## Step 2: Create a scheduling profile
A profile is what agents actually point at: one connected account plus one booking configuration (event type, length, tracking). Open **Settings → Apps → Calendly → Details** to reach **Calendly Profiles** ("Manage your Calendly scheduling profiles"). Profiles are listed on the left with a **New Profile** button; the form for the selected profile is on the right:
| Field | Default | What to set |
| ------------------------------------- | ---------------------------- | -------------------------------------------------------------------------------------------------------------------------------------------------------------------------- |
| **Alias** (required) | — | A name you'll recognize in agent settings, e.g. "Sales Team Calendar". |
| **Connected Account** | Your Calendly scheduling URL | Read-only — confirms which account this profile books on. |
| **Event Type** (required) | — | Dropdown of your Calendly event types, loaded live from Calendly and shown as "name (duration min)". If the list fails to load, a manual UUID input appears as a fallback. |
| **Event Length (minutes)** (required) | — | 1–1440. Match your event type's duration — this is what the agent offers callers. |
| **Find Slot After (hours)** | 1 | 0–72. Hours from now to start searching for available slots. Raise it (e.g. 24) if your team needs prep time before a meeting; keep it low for same-day booking. |
Click **Save**. To remove a profile, use the trash icon (a confirmation dialog protects against slips). Deleting the last profile leaves a fresh blank one to fill in.
Create one profile per distinct booking scenario — a "Demo (30 min)" profile and a "Support callback (15 min)" profile — rather than one generic profile. Each agent then picks the profile that matches its job, and you can change an event type in one place without touching agents.
### Route each lead to its owner's calendar
If contacts should book with their assigned rep rather than a shared calendar, enable the **Contact Scheduling Link Override** toggle ("When enabled, uses a contact field to override the default scheduling link"). Pick a **Scheduling Link Field** — a contact field that holds each contact's personal Calendly link (you can create a new field inline). At booking time the agent uses the link stored on the contact instead of the profile's event type, so the Event Type and Event Length fields disappear from the form.
The trade-off: the override only works for contacts whose field is populated. Keep a second, non-override profile as the shared fallback for everyone else.
### Tracking Parameters and Pre-fill Questions
Two collapsible sections handle attribution and forms:
* **Tracking Parameters** — UTM Campaign / Source / Medium / Content / Term and Salesforce UUID, stamped onto every booking. Values can be static tags (e.g. `outbound_q1`) or contact variables like `{{companyName}}` for your Calendly reporting.
* **Pre-fill Questions** — answers for the event type's custom questions, filled automatically at booking time (e.g. pre-fill "Phone number" with `{{phoneNumber}}`). If you use the scheduling-link override's manual question editor, the question text must match the event type configuration in Calendly exactly — a typo means the answer is silently skipped.
## Step 3: Point your agents at the profile
The agent-side wiring lives on [Scheduling and booking](/docs/integrations/scheduling-and-booking); the short version:
* **Chat agents** — enable **Schedule Meeting** in Advanced Settings (or add a Schedule Meeting flow node) and pick this Calendly profile in the **Calendar App** selector.
* **Voice agents** — add the **Check Availability** and **Book Appointment** tool presets and pick the profile in each tool's **Calendar** selector. For a complete build, follow the [appointment-booking voice agent guide](/docs/guides/appointment-booking-voice-agent).
* **SMS booking links** — a Calendly-only voice tool can text the caller your scheduling link instead of booking live on the call.
When an agent books a meeting, it's created in Calendly (your event type's own settings control invites and meeting links), recorded on the Revve contact, and can optionally auto-enroll the contact into a follow-up campaign.
The **Event Type** dropdown loads live from Calendly — if you just created or renamed an event type, reload the profiles page to see it. Separately, a daily sync (02:00 UTC, plus once on connect) keeps the scheduling-link lookup cache current — that's what resolves each contact's personal link when you use the **Contact Scheduling Link Override**.
## What's Next
Attach your Calendly profile to chat and voice agents, and configure what happens after a meeting books.
Build a voice agent end to end that checks availability and books on this calendar.