> ## Documentation Index
> Fetch the complete documentation index at: https://www.revve.ai/docs/llms.txt
> Use this file to discover all available pages before exploring further.
# Build a Lead Qualification Agent That Books Meetings
> A complete, copy-paste recipe: a website agent that qualifies visitors, captures their contact details, books meetings on your calendar, and hands hot leads to your team.
**What you'll build:** a website Chat Agent that greets visitors, asks the right qualifying questions, collects contact details from promising leads, books a meeting directly on your team's calendar, and escalates to a human on request. Qualified leads land in your Contacts (and your CRM, if connected) automatically.
**Time:** about 30 minutes. Every prompt and setting you need is on this page — copy, paste, adjust the bracketed parts.
## Prerequisites
* A calendar app connected in **Apps**: Calendly, Cal.com, or Chili Piper. To connect one, go to **Apps** in the dashboard, click **Install** on your provider, and complete the sign-in. (You can build the flow without it, but the booking step will show a "Configure" warning until connected.)
* Optional: HubSpot or Salesforce connected, if you want leads synced to your CRM.
## Step 1: Create a Conversational Flow agent
Go to **Agents > Chat Agents** → **+ New Chat Agent** → **Build from scratch**. Fill in:
| Field | Value |
| ------------ | ------------------------ |
| Chatbot Name | Lead Qualification Agent |
| Channel Type | Website |
| Chatbot Type | **Conversational Flow** |
We use Conversational Flow because qualification is a funnel — distinct stages with different objectives — and we want the agent unable to skip ahead (no booking before qualifying).
## Step 2: Set the Role and Global Objectives
Open the **Basic** tab (click **Start Editing** first). These two fields apply across every node of the flow.
**Role** — paste and adjust:
```text theme={null}
You are the assistant for [Acme], a [B2B invoicing platform for mid-size
companies]. You are warm, concise, and genuinely helpful — never pushy.
You write short messages: 1–3 sentences, one question at a time.
```
**Global Objectives** — paste and adjust:
```text theme={null}
Your goal is to help visitors learn about [Acme] and connect promising
leads with our sales team.
Rules that always apply:
- Answer product questions using the knowledge base. If you don't know,
say so and offer to connect them with the team.
- Never quote custom pricing or discounts. For pricing beyond what's
published, offer a meeting instead.
- Never invent customer names, statistics, or features.
- If the visitor is clearly not a fit, end warmly — no hard selling.
```
While you're in the Basic tab, also attach your [knowledge base](/docs/knowledge-base/knowledge-base-overview) under **Knowledge** so product questions get real answers.
## Step 3: Build the flow
Open the **Flow** tab. You'll create five connected nodes plus one global node:
```
Greeting ──→ Qualify ──→ Collect Contact ──→ Book Meeting ──→ Wrap Up
└──────────→ Polite Close
(global) Talk to a Human
```
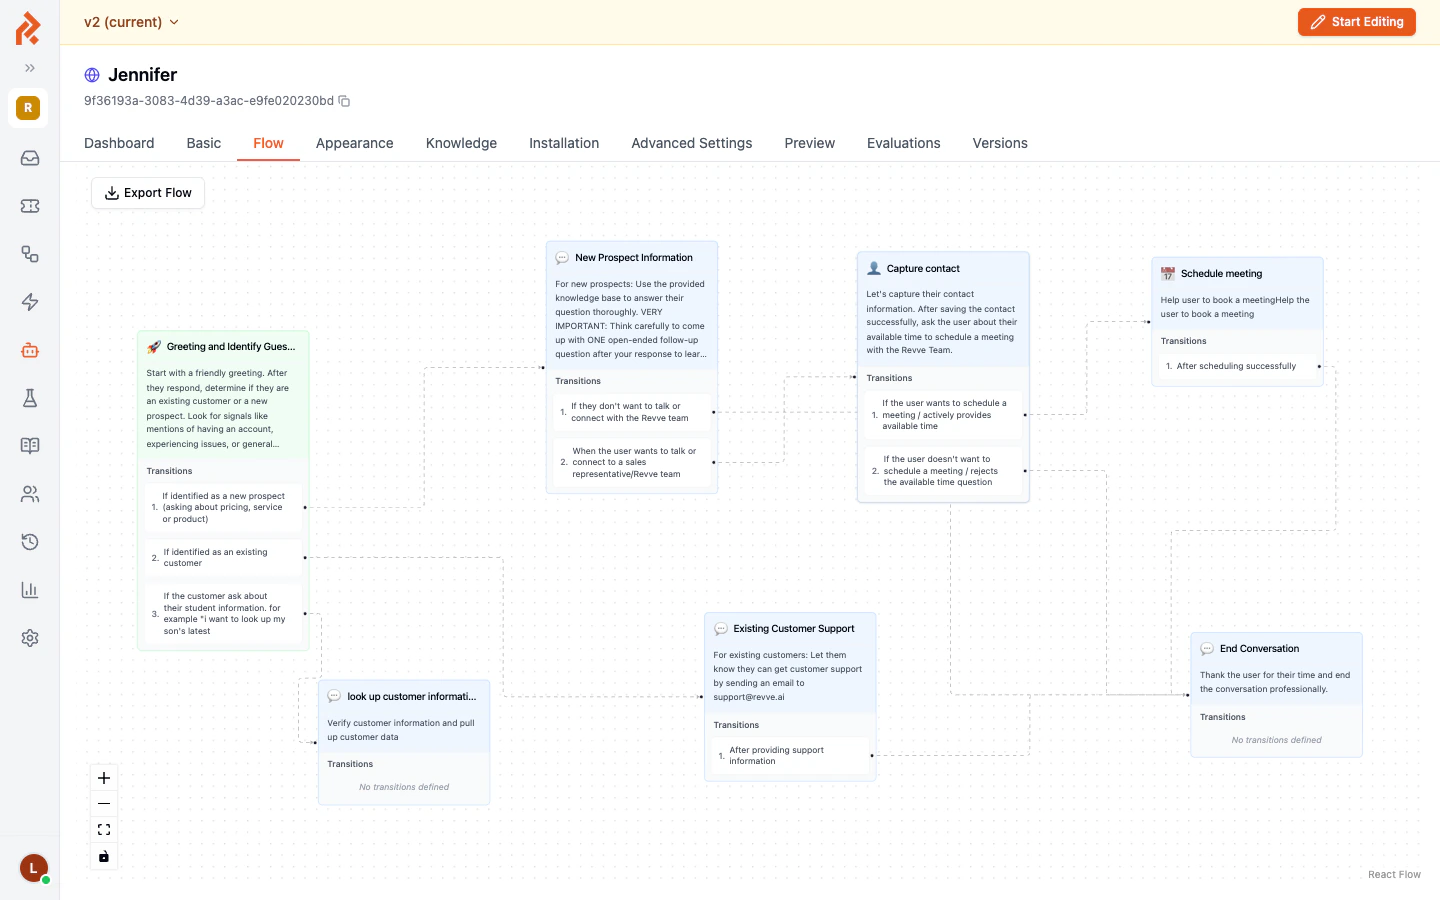 For each node below: create it, paste the **Instruction**, then add the **Transitions** listed (in the node panel, click **Add transition**, fill **Name** and **Condition**, and connect it to the target node).
### Node 1 — "Greeting" (Normal Conversation)
**Instruction:**
```text theme={null}
Greet the visitor and find out what brought them here today. If they ask
a product question, answer it from the knowledge base first, then ask a
light follow-up about their situation. Do not pitch anything yet.
```
**Transitions:**
| Name | Condition | → Target |
| --------------------- | -------------------------------------------------------------------------------------------- | -------- |
| Shows buying interest | The visitor asks about pricing, plans, demos, or describes a problem our product could solve | Qualify |
Visitors who just ask questions stay here — the node keeps answering from your knowledge base until buying interest appears.
### Node 2 — "Qualify" (Normal Conversation)
**Instruction:**
```text theme={null}
Understand whether this visitor is a good fit. Learn, conversationally
and one question at a time:
1. What problem are they trying to solve?
2. Company size (rough headcount or team size).
3. Timeline — are they evaluating now or researching for later?
A visitor is QUALIFIED if they have a problem we solve AND a company size
of [10+ employees] AND an active timeline (now or within 3 months).
Do not interrogate — weave questions into the conversation naturally.
```
**Transitions:**
| Name | Condition | → Target |
| --------- | ----------------------------------------------------------------------------------------------------------------- | --------------- |
| Qualified | The visitor matches the qualification criteria: relevant problem, sufficient company size, and an active timeline | Collect Contact |
| Not a fit | The visitor clearly does not match the criteria, e.g. wrong use case, far-future timeline, or just browsing | Polite Close |
### Node 3 — "Collect Contact" (Contact Collection)
Create the node with type **Contact Collection**. In the node panel, the contact collection toggle is already on; configure it:
For each node below: create it, paste the **Instruction**, then add the **Transitions** listed (in the node panel, click **Add transition**, fill **Name** and **Condition**, and connect it to the target node).
### Node 1 — "Greeting" (Normal Conversation)
**Instruction:**
```text theme={null}
Greet the visitor and find out what brought them here today. If they ask
a product question, answer it from the knowledge base first, then ask a
light follow-up about their situation. Do not pitch anything yet.
```
**Transitions:**
| Name | Condition | → Target |
| --------------------- | -------------------------------------------------------------------------------------------- | -------- |
| Shows buying interest | The visitor asks about pricing, plans, demos, or describes a problem our product could solve | Qualify |
Visitors who just ask questions stay here — the node keeps answering from your knowledge base until buying interest appears.
### Node 2 — "Qualify" (Normal Conversation)
**Instruction:**
```text theme={null}
Understand whether this visitor is a good fit. Learn, conversationally
and one question at a time:
1. What problem are they trying to solve?
2. Company size (rough headcount or team size).
3. Timeline — are they evaluating now or researching for later?
A visitor is QUALIFIED if they have a problem we solve AND a company size
of [10+ employees] AND an active timeline (now or within 3 months).
Do not interrogate — weave questions into the conversation naturally.
```
**Transitions:**
| Name | Condition | → Target |
| --------- | ----------------------------------------------------------------------------------------------------------------- | --------------- |
| Qualified | The visitor matches the qualification criteria: relevant problem, sufficient company size, and an active timeline | Collect Contact |
| Not a fit | The visitor clearly does not match the criteria, e.g. wrong use case, far-future timeline, or just browsing | Polite Close |
### Node 3 — "Collect Contact" (Contact Collection)
Create the node with type **Contact Collection**. In the node panel, the contact collection toggle is already on; configure it:
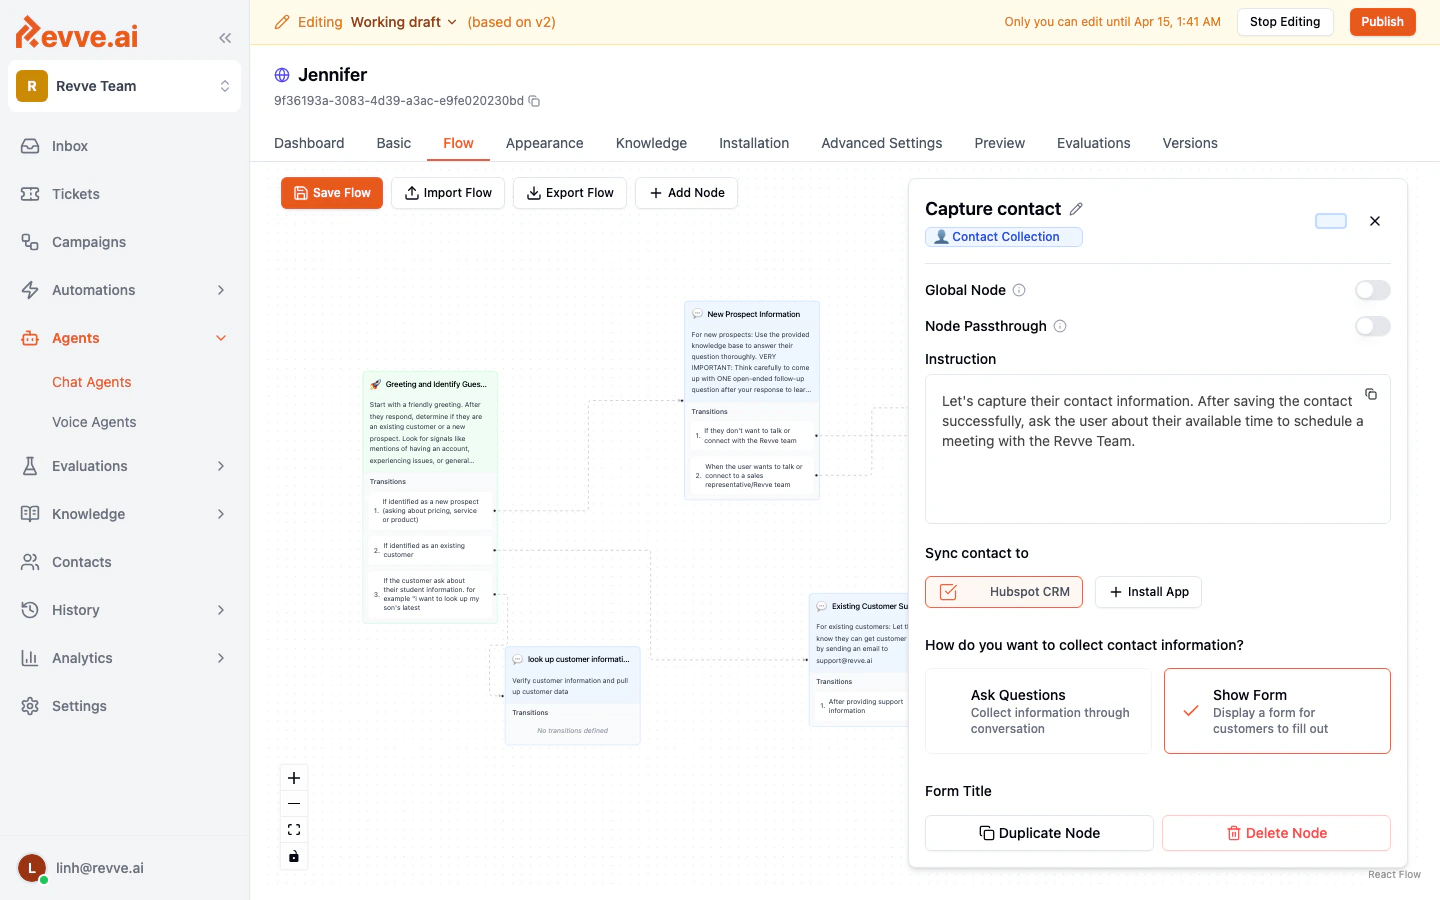 * **How do you want to collect contact information?** → **Ask Questions** (conversational — keeps the chat natural; choose **Show Form** instead if you prefer a structured form in the chat).
* **Contact Fields:** add **Full Name** (required), **Email** (required), **Company Name** (required), **Phone Number** (optional).
* **Sync contact to:** tick your CRM (HubSpot / Salesforce) if connected.
**Instruction:**
```text theme={null}
The visitor is qualified. Tell them you'd love to set up a short call
with the team, and collect their contact details so we can confirm the
meeting. Be brief — they've already shown interest.
```
**Transitions:**
| Name | Condition | → Target |
| ----------------- | ------------------------------------------------------- | ------------ |
| Contact captured | The visitor has provided their name, email, and company | Book Meeting |
| Declines to share | The visitor does not want to share contact details | Polite Close |
### Node 4 — "Book Meeting" (Schedule Meeting)
Create the node with type **Schedule Meeting**. In the node panel:
* **How do you want to collect contact information?** → **Ask Questions** (conversational — keeps the chat natural; choose **Show Form** instead if you prefer a structured form in the chat).
* **Contact Fields:** add **Full Name** (required), **Email** (required), **Company Name** (required), **Phone Number** (optional).
* **Sync contact to:** tick your CRM (HubSpot / Salesforce) if connected.
**Instruction:**
```text theme={null}
The visitor is qualified. Tell them you'd love to set up a short call
with the team, and collect their contact details so we can confirm the
meeting. Be brief — they've already shown interest.
```
**Transitions:**
| Name | Condition | → Target |
| ----------------- | ------------------------------------------------------- | ------------ |
| Contact captured | The visitor has provided their name, email, and company | Book Meeting |
| Declines to share | The visitor does not want to share contact details | Polite Close |
### Node 4 — "Book Meeting" (Schedule Meeting)
Create the node with type **Schedule Meeting**. In the node panel:
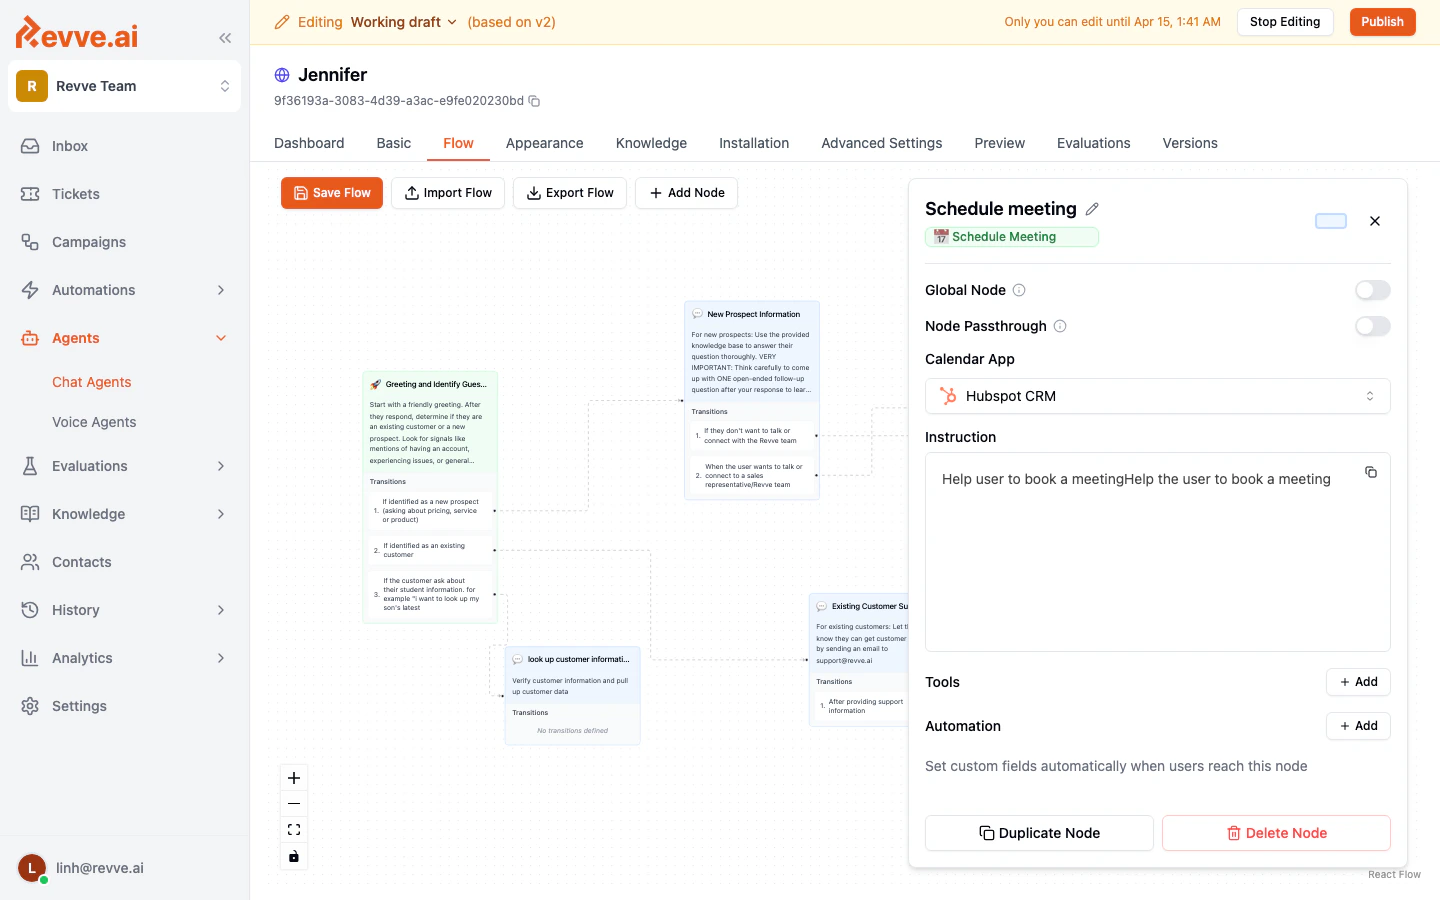 * **Calendar App:** select your connected provider (Calendly / Cal.com / Chili Piper). The agent gets availability checking and booking automatically — no extra setup. (Chili Piper additionally asks for a **Booking Method**: Router or Direct Link.)
**Instruction:**
```text theme={null}
Offer to book a 30-minute intro call. Propose available times, confirm
the visitor's choice, and book it. After booking, confirm the day and
time clearly and tell them an invite is on its way to their email.
```
**Transitions:**
| Name | Condition | → Target |
| ----------------- | -------------------------------------------------------------- | -------- |
| Meeting booked | The meeting has been successfully booked | Wrap Up |
| Can't find a time | The visitor doesn't want to book now or no proposed time works | Wrap Up |
### Node 5 — "Wrap Up" and "Polite Close" (Normal Conversation)
Two simple closing nodes, no outgoing transitions.
**"Wrap Up" instruction:**
```text theme={null}
Thank the visitor. If a meeting was booked, restate the day and time.
Offer to answer anything else in the meantime.
```
**"Polite Close" instruction:**
```text theme={null}
Thank the visitor warmly and let them know we're here whenever they're
ready. If relevant, point them to [the docs / newsletter / free trial].
Never pressure them.
```
### Global node — "Talk to a Human"
Visitors should reach a human from *anywhere* in the flow. Create one more **Normal Conversation** node:
* Toggle **Global Node** on, and set its **Condition**: `The visitor explicitly asks to talk to a human, an agent, or a real person`
* Toggle **Human Escalation** on — this gives the node the ability to transfer the conversation to your team.
**Instruction:**
```text theme={null}
The visitor wants a human. Acknowledge it immediately and positively,
then escalate to a human agent. If no one is available, let them know
the team will follow up, and collect their email if we don't have it.
```
Escalated chats appear in your [Inbox](/docs/inbox/human-takeover) assigned to your team.
## Step 4: Test it
Open the **Preview** tab and run each path end to end:
| # | Play this visitor | Expect |
| - | ------------------------------------------------------------------------------------------------------ | ------------------------------------------------------------------------- |
| 1 | Qualified buyer: "We're a 50-person company drowning in manual invoicing, looking to fix this quarter" | Qualify → contact questions → booking with real time slots → confirmation |
| 2 | Bad fit: "I'm a student researching invoicing software for a paper" | Friendly answers, then Polite Close — **no** contact push |
| 3 | "Can I talk to a real person?" — said mid-qualification | Immediate escalation from any node |
| 4 | A product question your knowledge base covers | Correct answer, conversation continues naturally |
| 5 | Refuse to give your email when asked | Graceful Polite Close, no nagging |
| 6 | Ask for a custom discount | Declines to quote, offers a meeting instead |
Fix issues at the **node** level: wrong routing → sharpen the transition **Condition** wording; wrong behavior inside a stage → sharpen that node's **Instruction**.
## Step 5: Publish and install
1. Click **Publish** and confirm (see [Publishing & Versioning](/docs/getting-started/publishing-and-versioning)).
2. Install the widget on your site — embed snippet and WordPress instructions in [Website Installation](/docs/channel-setup/website-installation).
## Step 6: Watch the leads come in
* **Contacts** — every captured lead with name, email, and company (synced to your CRM if you enabled it).
* **Inbox** — full conversations; escalations arrive assigned to your team.
* **Your calendar** — booked meetings appear in your provider as usual.
* **History > Chat History** — review conversations to refine qualification criteria over time.
## Variations
* **Voice version:** the same funnel works on the phone — build a [Voice Agent](/docs/voice-agents/creating-your-first-voice-agent) with the Conversational Flow engine and reuse these node instructions.
* **Instant follow-up call:** pair this agent with a [Campaign](/docs/campaigns/campaign-overview) that calls captured leads within minutes — enroll them via the campaigns API using the contact created here.
* **Stricter funnels:** add a node between Qualify and Collect Contact that asks a budget question, with transitions splitting high/low budget into different booking calendars.
* **Calendar App:** select your connected provider (Calendly / Cal.com / Chili Piper). The agent gets availability checking and booking automatically — no extra setup. (Chili Piper additionally asks for a **Booking Method**: Router or Direct Link.)
**Instruction:**
```text theme={null}
Offer to book a 30-minute intro call. Propose available times, confirm
the visitor's choice, and book it. After booking, confirm the day and
time clearly and tell them an invite is on its way to their email.
```
**Transitions:**
| Name | Condition | → Target |
| ----------------- | -------------------------------------------------------------- | -------- |
| Meeting booked | The meeting has been successfully booked | Wrap Up |
| Can't find a time | The visitor doesn't want to book now or no proposed time works | Wrap Up |
### Node 5 — "Wrap Up" and "Polite Close" (Normal Conversation)
Two simple closing nodes, no outgoing transitions.
**"Wrap Up" instruction:**
```text theme={null}
Thank the visitor. If a meeting was booked, restate the day and time.
Offer to answer anything else in the meantime.
```
**"Polite Close" instruction:**
```text theme={null}
Thank the visitor warmly and let them know we're here whenever they're
ready. If relevant, point them to [the docs / newsletter / free trial].
Never pressure them.
```
### Global node — "Talk to a Human"
Visitors should reach a human from *anywhere* in the flow. Create one more **Normal Conversation** node:
* Toggle **Global Node** on, and set its **Condition**: `The visitor explicitly asks to talk to a human, an agent, or a real person`
* Toggle **Human Escalation** on — this gives the node the ability to transfer the conversation to your team.
**Instruction:**
```text theme={null}
The visitor wants a human. Acknowledge it immediately and positively,
then escalate to a human agent. If no one is available, let them know
the team will follow up, and collect their email if we don't have it.
```
Escalated chats appear in your [Inbox](/docs/inbox/human-takeover) assigned to your team.
## Step 4: Test it
Open the **Preview** tab and run each path end to end:
| # | Play this visitor | Expect |
| - | ------------------------------------------------------------------------------------------------------ | ------------------------------------------------------------------------- |
| 1 | Qualified buyer: "We're a 50-person company drowning in manual invoicing, looking to fix this quarter" | Qualify → contact questions → booking with real time slots → confirmation |
| 2 | Bad fit: "I'm a student researching invoicing software for a paper" | Friendly answers, then Polite Close — **no** contact push |
| 3 | "Can I talk to a real person?" — said mid-qualification | Immediate escalation from any node |
| 4 | A product question your knowledge base covers | Correct answer, conversation continues naturally |
| 5 | Refuse to give your email when asked | Graceful Polite Close, no nagging |
| 6 | Ask for a custom discount | Declines to quote, offers a meeting instead |
Fix issues at the **node** level: wrong routing → sharpen the transition **Condition** wording; wrong behavior inside a stage → sharpen that node's **Instruction**.
## Step 5: Publish and install
1. Click **Publish** and confirm (see [Publishing & Versioning](/docs/getting-started/publishing-and-versioning)).
2. Install the widget on your site — embed snippet and WordPress instructions in [Website Installation](/docs/channel-setup/website-installation).
## Step 6: Watch the leads come in
* **Contacts** — every captured lead with name, email, and company (synced to your CRM if you enabled it).
* **Inbox** — full conversations; escalations arrive assigned to your team.
* **Your calendar** — booked meetings appear in your provider as usual.
* **History > Chat History** — review conversations to refine qualification criteria over time.
## Variations
* **Voice version:** the same funnel works on the phone — build a [Voice Agent](/docs/voice-agents/creating-your-first-voice-agent) with the Conversational Flow engine and reuse these node instructions.
* **Instant follow-up call:** pair this agent with a [Campaign](/docs/campaigns/campaign-overview) that calls captured leads within minutes — enroll them via the campaigns API using the contact created here.
* **Stricter funnels:** add a node between Qualify and Collect Contact that asks a budget question, with transitions splitting high/low budget into different booking calendars.