> ## Documentation Index
> Fetch the complete documentation index at: https://www.revve.ai/docs/llms.txt
> Use this file to discover all available pages before exploring further.
# Creating Your First Chat Agent
> Step-by-step guide to create, configure, and publish your first Chat Agent.
This guide walks you through creating a Chat Agent from scratch, configuring its basic settings, and getting it ready for deployment.
## Step 1: Navigate to Chat Agents
From the left sidebar, click **Agents** > **Chat Agents** to open the Chat Agents page. Here you'll see all your existing agents displayed as cards.
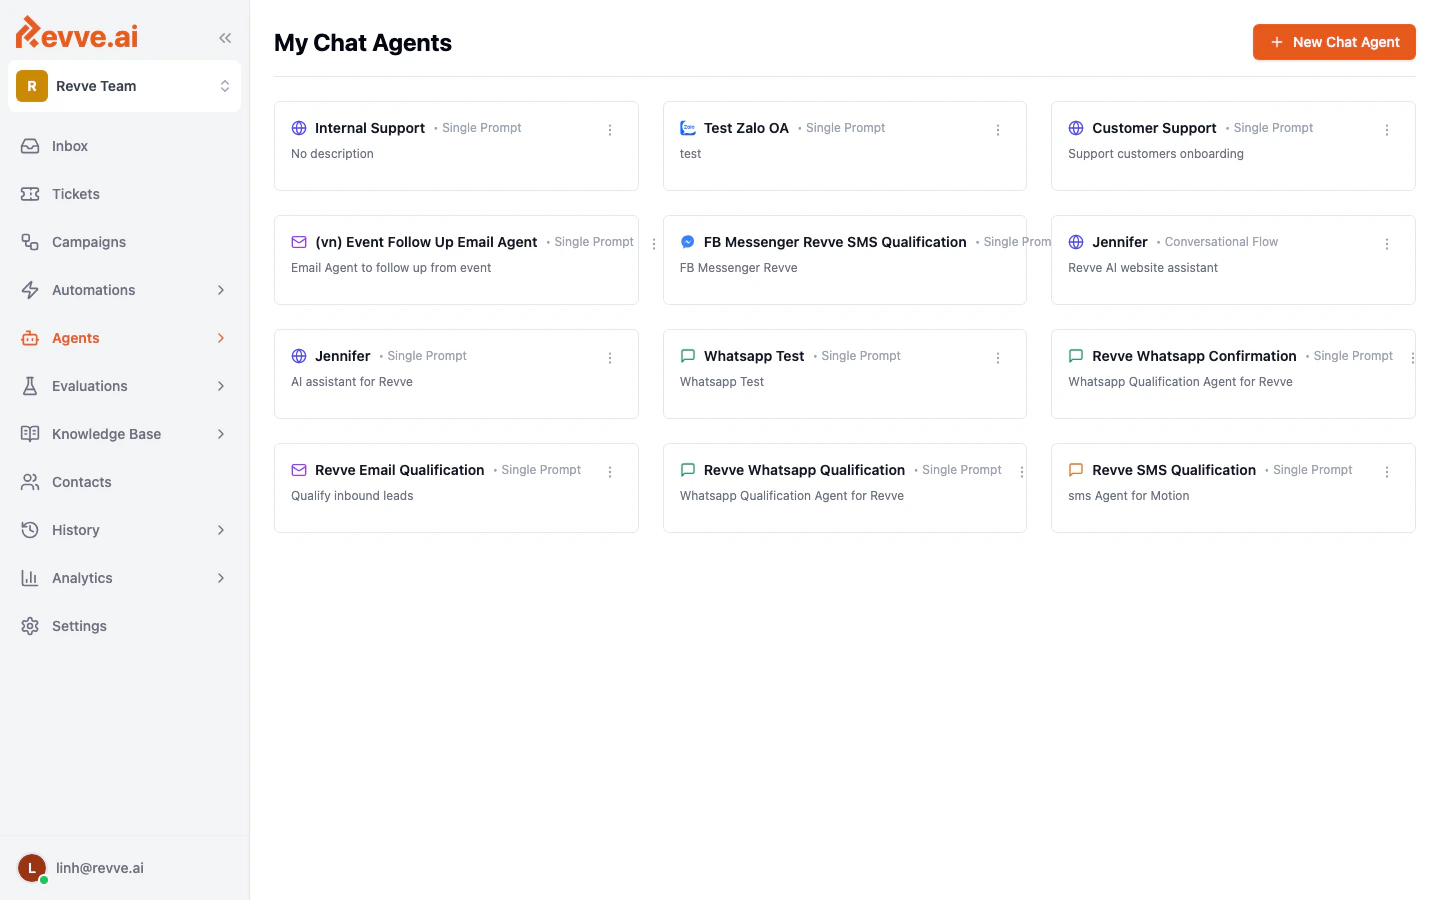 Each card shows:
* **Agent name** — The name you gave the agent.
* **Engine type** — "Single Prompt" or "Conversational Flow".
* **Channel icon** — Indicates the channel (website, email, WhatsApp, etc.).
* **Description** — A brief summary of what the agent does.
## Step 2: Create a New Agent
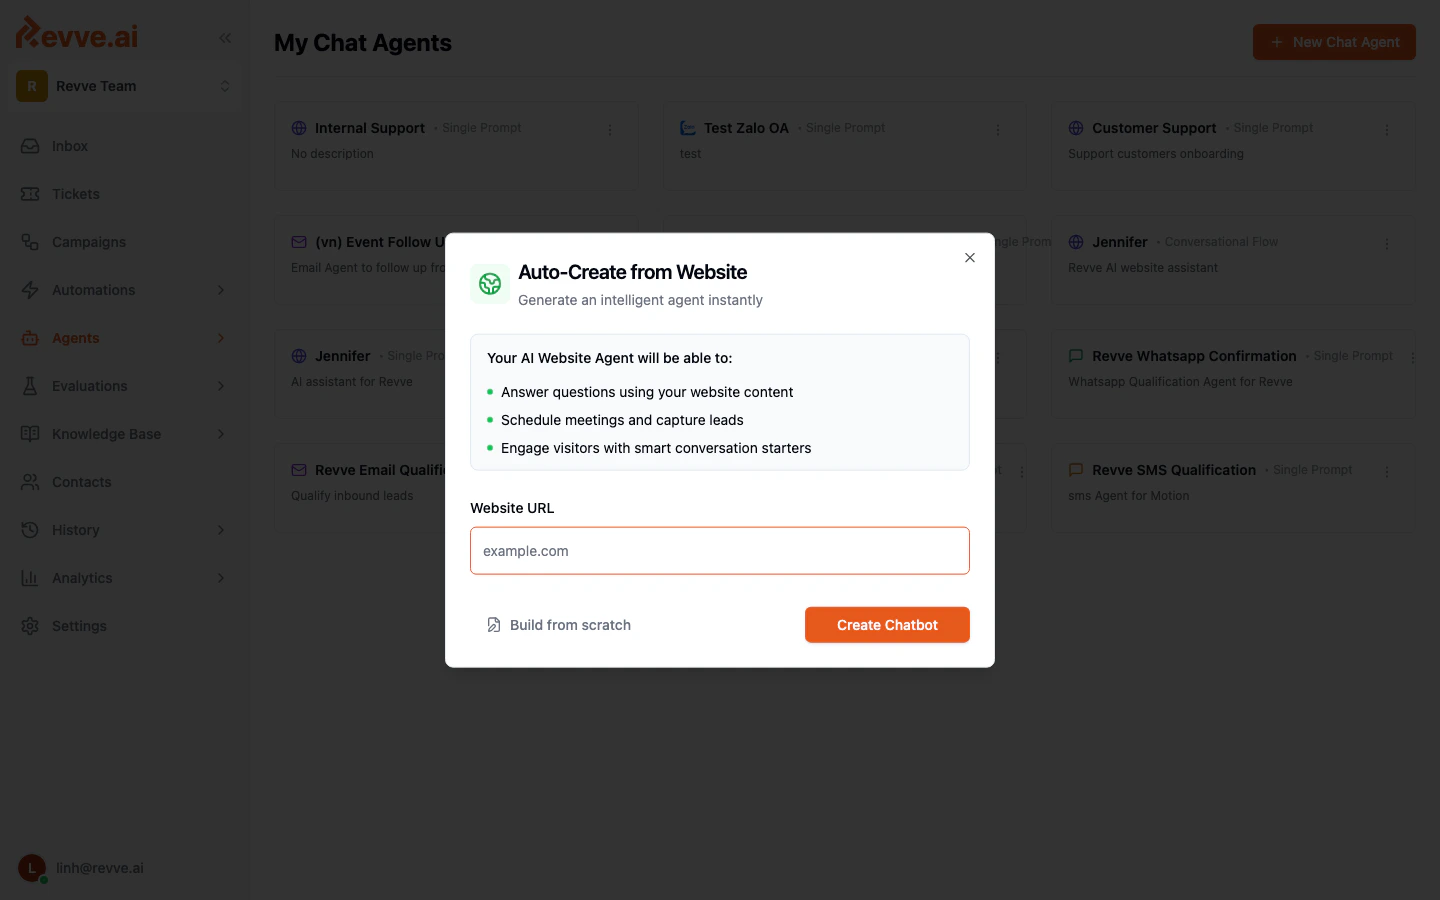
Click the **+ New Chat Agent** button in the top-right corner. You'll see two options:
### Option A: Auto-Create from Website (Recommended for website agents)
Enter your **Website URL** and click **Create Chatbot**. Revve will:
1. Crawl your website to extract content.
2. Automatically generate agent instructions based on your site.
3. Set up a knowledge base from your web pages.
4. Create conversation starters relevant to your business.
This is the fastest way to get a working agent — you can fine-tune it afterward.
Each card shows:
* **Agent name** — The name you gave the agent.
* **Engine type** — "Single Prompt" or "Conversational Flow".
* **Channel icon** — Indicates the channel (website, email, WhatsApp, etc.).
* **Description** — A brief summary of what the agent does.
## Step 2: Create a New Agent
Click the **+ New Chat Agent** button in the top-right corner. You'll see two options:
### Option A: Auto-Create from Website (Recommended for website agents)
Enter your **Website URL** and click **Create Chatbot**. Revve will:
1. Crawl your website to extract content.
2. Automatically generate agent instructions based on your site.
3. Set up a knowledge base from your web pages.
4. Create conversation starters relevant to your business.
This is the fastest way to get a working agent — you can fine-tune it afterward.
 ### Option B: Build from Scratch
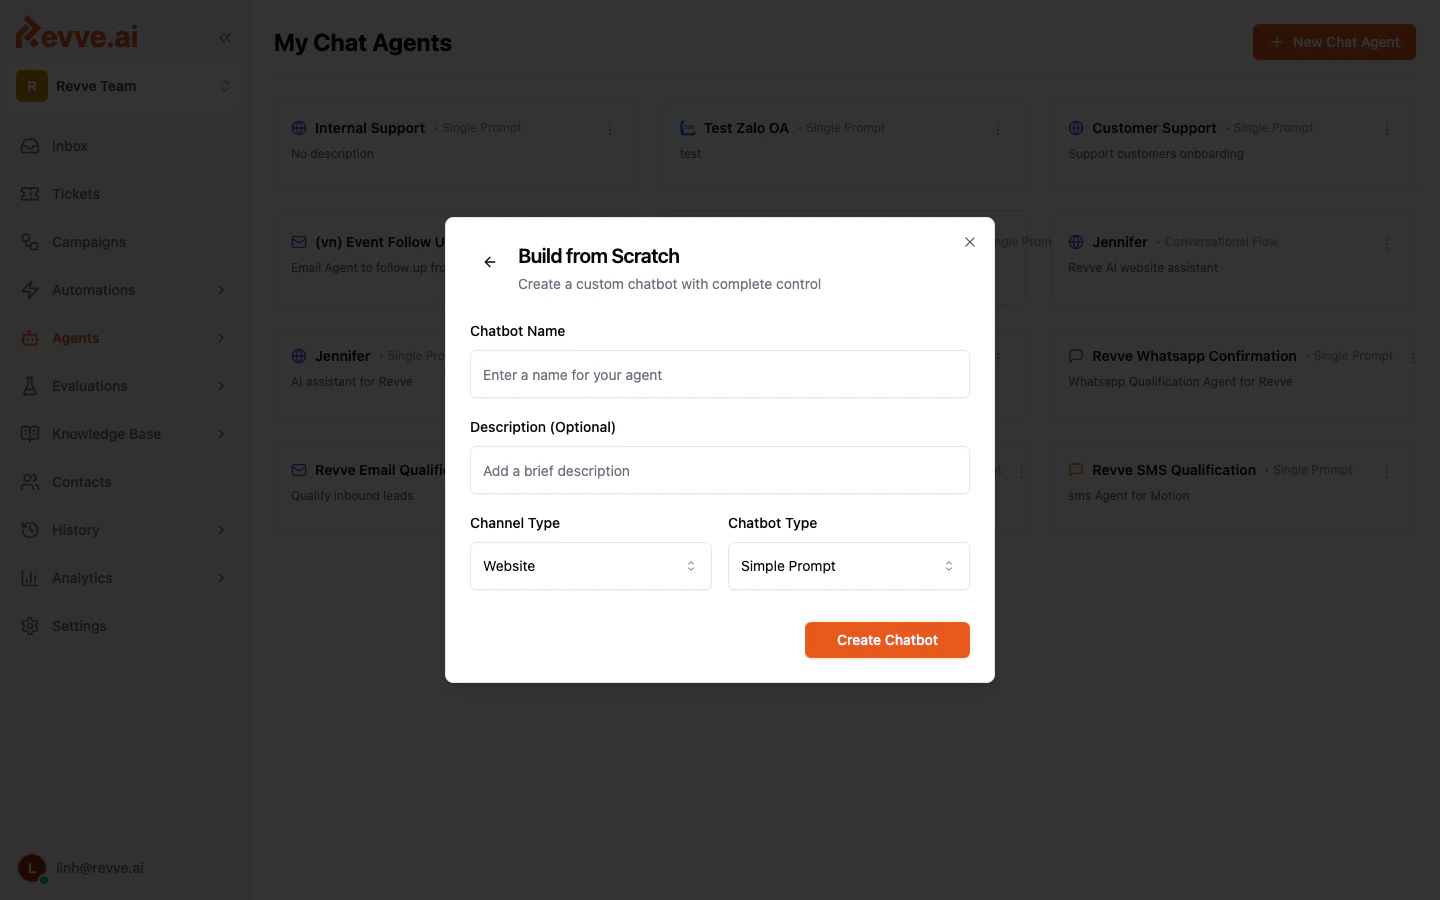
Click **Build from scratch** if you want full control from the start. Fill in:
| Field | Description |
| ---------------- | --------------------------------------------------------------------------------------------------- |
| **Chatbot Name** | A descriptive name for your agent (e.g., "Sales Assistant", "Support Bot"). |
| **Description** | Optional. A brief note about what this agent does. |
| **Channel Type** | The channel this agent will operate on: Website, Email, SMS, WhatsApp, Zalo, Zalo OA, or Messenger. |
| **Chatbot Type** | **Simple Prompt** (instruction-based) or **Conversational Flow** (visual flow designer). |
Click **Create Chatbot** to proceed.
### Option B: Build from Scratch
Click **Build from scratch** if you want full control from the start. Fill in:
| Field | Description |
| ---------------- | --------------------------------------------------------------------------------------------------- |
| **Chatbot Name** | A descriptive name for your agent (e.g., "Sales Assistant", "Support Bot"). |
| **Description** | Optional. A brief note about what this agent does. |
| **Channel Type** | The channel this agent will operate on: Website, Email, SMS, WhatsApp, Zalo, Zalo OA, or Messenger. |
| **Chatbot Type** | **Simple Prompt** (instruction-based) or **Conversational Flow** (visual flow designer). |
Click **Create Chatbot** to proceed.
 ## Step 3: Configure Basic Settings
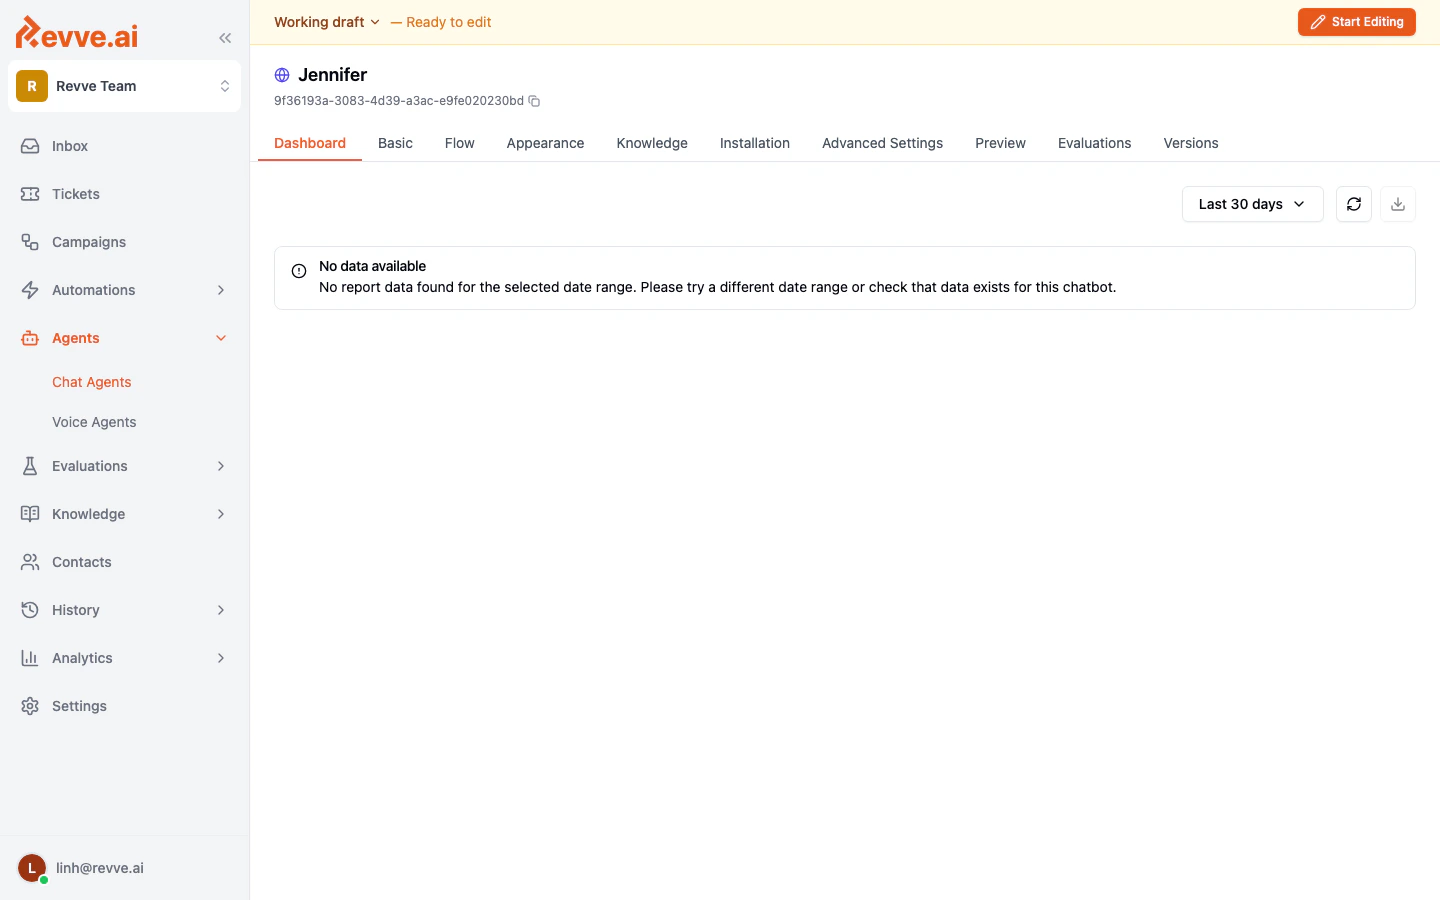
After creation, you'll land on the agent's **Dashboard**. Click **Start Editing** in the top-right corner to enter edit mode, then navigate to the **Basic** tab.
## Step 3: Configure Basic Settings
After creation, you'll land on the agent's **Dashboard**. Click **Start Editing** in the top-right corner to enter edit mode, then navigate to the **Basic** tab.
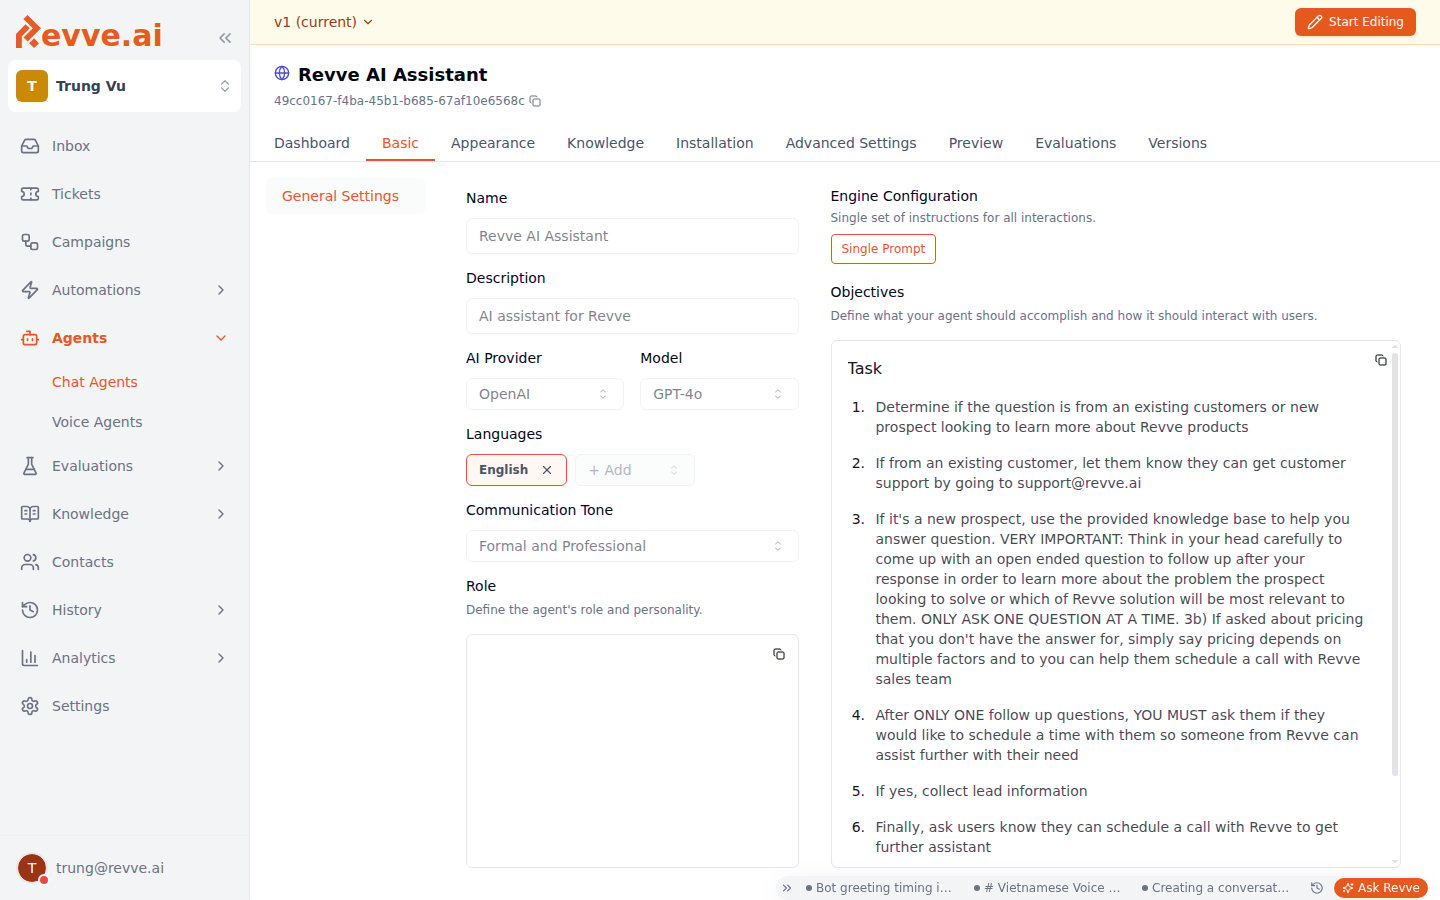 All Basic settings live under a single **General Settings** section. Here's what each field does:
| Field | Description |
| ------------------------ | --------------------------------------------------------------------------------------------------------------------------------------- |
| **Name** | The agent's display name (max 50 characters). |
| **Description** | What this agent does (max 500 characters). |
| **AI Provider** | The LLM provider: OpenAI or Anthropic (Claude). |
| **Model** | The specific model to use — e.g., GPT-4.1, Claude Sonnet 4. More capable models produce better responses but may be slower. |
| **Engine Configuration** | Shows whether this is a Single Prompt or Conversational Flow agent. |
| **Languages** | One or more languages the agent should respond in. Click **+ Add** to add more languages. |
| **Communication Tone** | Sets the writing style — options include "Formal and Professional", "Friendly and Casual", "Technical and Precise", and more. |
| **Role** | Describes the agent's persona — e.g., "You're a digital assistant, ready to engage website visitors through personalized conversation." |
### Objectives (Instructions)
The **Objectives** text area is the most important field. This is where you tell the agent what to do:
* What is the agent's goal?
* What topics should it cover?
* What should it avoid?
* What guardrails should it follow?
**Tips for writing good instructions:**
* Be specific about what the agent should and shouldn't do.
* Include guardrails (e.g., "Never reveal internal info", "Always respond in English").
* Define the agent's boundaries (e.g., "Only answer questions about our products").
* Keep instructions concise but comprehensive.
## Step 4: Save and Continue
Click **Save Changes** to save your configuration. From here, you can continue to:
* **Appearance** — Customize the chat widget look and feel (website agents only).
* **Knowledge** — Add documents, web pages, and FAQs for the agent to reference.
* **Installation** — Get the embed code to add the widget to your website.
* **Advanced Settings** — Configure escalation, webhooks, tools, and more.
## Step 5: Publish Your Agent
Once you're satisfied with your configuration:
1. Navigate to the **Versions** tab (or click **Publish** in the top bar).
2. Add an optional publish note describing your changes.
3. Click **Publish** to make the agent live.
Your agent is now active and ready to receive conversations on its configured channel.
You can always come back and edit your agent. Changes are saved as a draft and only go live when you publish a new version. See [Publishing & Versioning](/docs/getting-started/publishing-and-versioning) for details.
## Navigation Reference
Once inside a Chat Agent, you'll see these tabs across the top:
| Tab | Purpose |
| --------------------- | ---------------------------------------------------------------------------------------------------------------- |
| **Dashboard** | Overview metrics and analytics for this agent. |
| **Basic** | Core configuration — name, model, language, tone, instructions. |
| **Flow** | Visual conversation designer (Conversational Flow agents only). |
| **Appearance** | Widget styling and behavior (website agents only). |
| **Knowledge** | Manage knowledge base, FAQs, and content sources. |
| **Installation** | Embed code and installation instructions. |
| **Advanced Settings** | Escalation, tools, webhooks, notifications, and more. |
| **Preview** | Test your agent in a simulated chat. |
| **Evaluations** | Create and run test cases to validate agent behavior. |
| **Versions** | View published versions and manage drafts. Past versions are read-only (**View**) — there's no restore/rollback. |
All Basic settings live under a single **General Settings** section. Here's what each field does:
| Field | Description |
| ------------------------ | --------------------------------------------------------------------------------------------------------------------------------------- |
| **Name** | The agent's display name (max 50 characters). |
| **Description** | What this agent does (max 500 characters). |
| **AI Provider** | The LLM provider: OpenAI or Anthropic (Claude). |
| **Model** | The specific model to use — e.g., GPT-4.1, Claude Sonnet 4. More capable models produce better responses but may be slower. |
| **Engine Configuration** | Shows whether this is a Single Prompt or Conversational Flow agent. |
| **Languages** | One or more languages the agent should respond in. Click **+ Add** to add more languages. |
| **Communication Tone** | Sets the writing style — options include "Formal and Professional", "Friendly and Casual", "Technical and Precise", and more. |
| **Role** | Describes the agent's persona — e.g., "You're a digital assistant, ready to engage website visitors through personalized conversation." |
### Objectives (Instructions)
The **Objectives** text area is the most important field. This is where you tell the agent what to do:
* What is the agent's goal?
* What topics should it cover?
* What should it avoid?
* What guardrails should it follow?
**Tips for writing good instructions:**
* Be specific about what the agent should and shouldn't do.
* Include guardrails (e.g., "Never reveal internal info", "Always respond in English").
* Define the agent's boundaries (e.g., "Only answer questions about our products").
* Keep instructions concise but comprehensive.
## Step 4: Save and Continue
Click **Save Changes** to save your configuration. From here, you can continue to:
* **Appearance** — Customize the chat widget look and feel (website agents only).
* **Knowledge** — Add documents, web pages, and FAQs for the agent to reference.
* **Installation** — Get the embed code to add the widget to your website.
* **Advanced Settings** — Configure escalation, webhooks, tools, and more.
## Step 5: Publish Your Agent
Once you're satisfied with your configuration:
1. Navigate to the **Versions** tab (or click **Publish** in the top bar).
2. Add an optional publish note describing your changes.
3. Click **Publish** to make the agent live.
Your agent is now active and ready to receive conversations on its configured channel.
You can always come back and edit your agent. Changes are saved as a draft and only go live when you publish a new version. See [Publishing & Versioning](/docs/getting-started/publishing-and-versioning) for details.
## Navigation Reference
Once inside a Chat Agent, you'll see these tabs across the top:
| Tab | Purpose |
| --------------------- | ---------------------------------------------------------------------------------------------------------------- |
| **Dashboard** | Overview metrics and analytics for this agent. |
| **Basic** | Core configuration — name, model, language, tone, instructions. |
| **Flow** | Visual conversation designer (Conversational Flow agents only). |
| **Appearance** | Widget styling and behavior (website agents only). |
| **Knowledge** | Manage knowledge base, FAQs, and content sources. |
| **Installation** | Embed code and installation instructions. |
| **Advanced Settings** | Escalation, tools, webhooks, notifications, and more. |
| **Preview** | Test your agent in a simulated chat. |
| **Evaluations** | Create and run test cases to validate agent behavior. |
| **Versions** | View published versions and manage drafts. Past versions are read-only (**View**) — there's no restore/rollback. |
 ## What's Next
* [Understanding Engine Types](/docs/getting-started/understanding-engine-types) — Learn when to use Single Prompt vs. Conversational Flow.
* [Publishing & Versioning](/docs/getting-started/publishing-and-versioning) — How drafts, publishing, and version history work.
## What's Next
* [Understanding Engine Types](/docs/getting-started/understanding-engine-types) — Learn when to use Single Prompt vs. Conversational Flow.
* [Publishing & Versioning](/docs/getting-started/publishing-and-versioning) — How drafts, publishing, and version history work.