> ## Documentation Index
> Fetch the complete documentation index at: https://www.revve.ai/docs/llms.txt
> Use this file to discover all available pages before exploring further.
# Creating and Connecting Nodes
> How to add new nodes, define transitions between them, and set conditions that control the conversation path.
A conversational flow is built from **nodes** (the stages of a conversation) and **transitions** (the rules that move the conversation from one stage to the next). This guide walks you through creating both.
## Adding a New Node
1. Make sure you are in editing mode (click **Start Editing** if the button is visible).
2. Click the **Add Node** button in the toolbar above the canvas.
3. Fill in the fields in the **Create New Node** dialog:
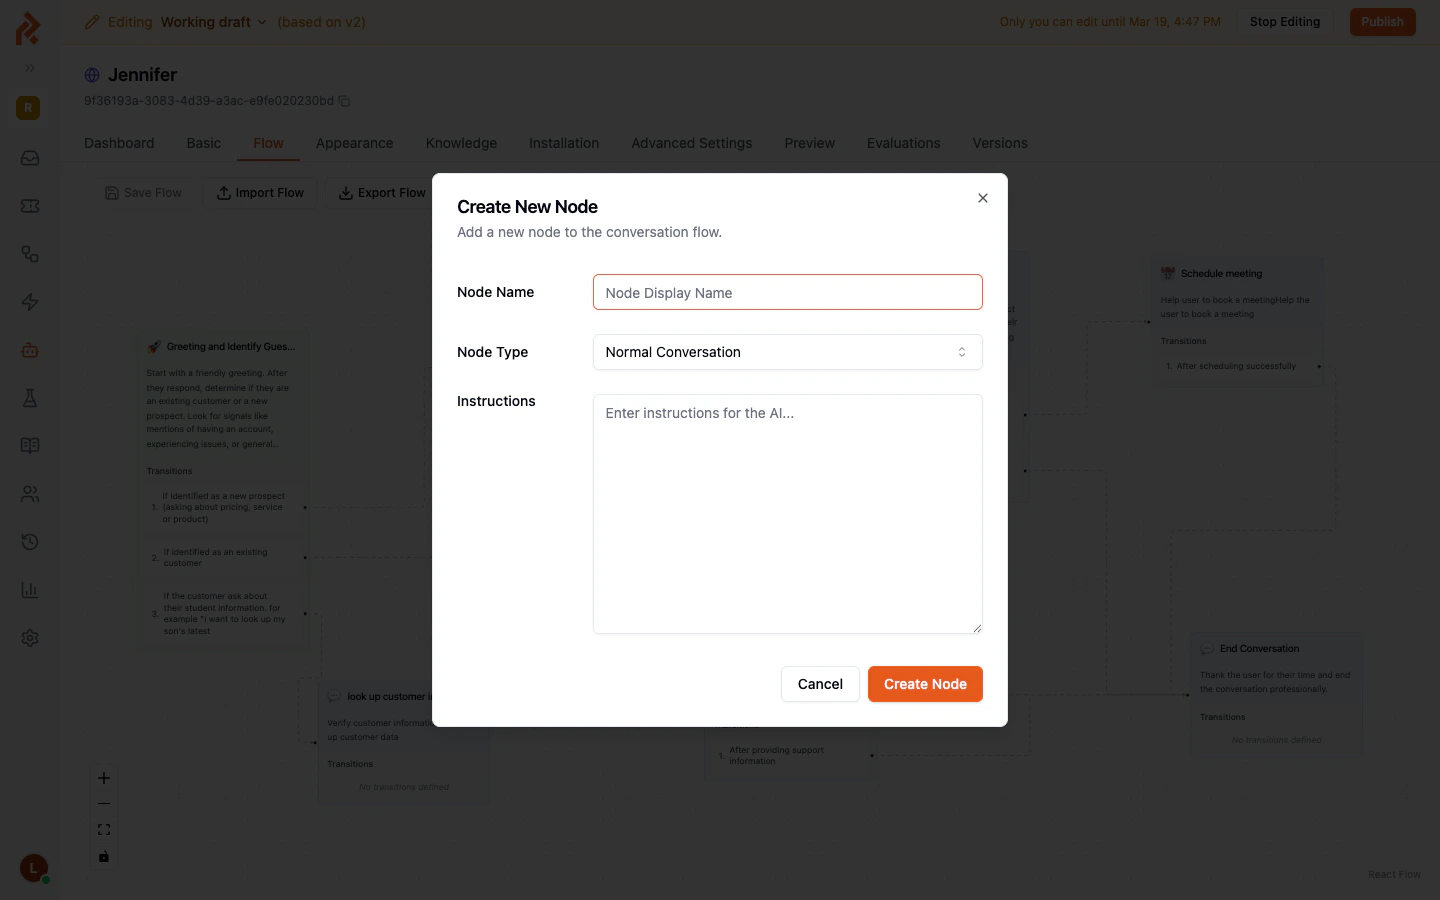 | Field | Description |
| ---------------- | --------------------------------------------------------------------------------------------------------------------------------------------------------------------------- |
| **Node Name** | A short, descriptive label for this stage of the conversation (for example, "Greeting", "Qualify Lead", "Schedule Demo"). This name appears on the node card in the canvas. |
| **Node Type** | Determines the special behavior of the node. See the table below. |
| **Instructions** | The AI prompt for this stage. Write in plain language what the agent should do, say, or ask when the conversation reaches this node. |
### Node Types
| Type | Purpose |
| ----------------------- | -------------------------------------------------------------------------------------------------------------------------------------------------------------------------------------------------------------------------------------------------------------------------------------------------------------------------------------------------------- |
| **Normal Conversation** | A general-purpose node for dialogue, Q\&A, or any step that does not require built-in contact or scheduling features. |
| **Contact Collection** | Automatically enables contact-information gathering at this node. The agent will prompt the visitor for details such as name, email, and phone number. |
| **Schedule Meeting** | Automatically enables meeting-booking capabilities at this node. The agent can check calendar availability and help the visitor pick a time. |
| **Transfer Call** | A telephony hand-off node (transfer to a phone number, SIP address, or in-app agent). Its settings — destination numbers, bridge/cold transfer, a spoken transfer message — target voice calls; for handing a chat conversation to a human, use the **Human Escalation** toggle instead ([Flow Node Features](/docs/conversational-flow/flow-node-features)). |
4. Click **Create Node**. The new node appears on the canvas and you can drag it to the desired position.
## Understanding Transitions
Transitions are the arrows that connect one node to another. Each transition carries a **condition** -- a plain-language rule that tells the AI when to move the conversation along that path.
For example, a "Greeting" node might have two transitions:
* "If the visitor is a new prospect asking about pricing" -- leads to the "New Prospect Information" node.
* "If the visitor is an existing customer" -- leads to the "Existing Customer Support" node.
The AI reads all available transition conditions at each turn and picks the one that best matches the visitor's latest message. If none match, the conversation stays at the current node.
## Creating a Transition
There are two ways to add a transition:
### Option A -- From the Node Card
Each node card on the canvas displays its existing transitions in the **Transitions** section at the bottom. In editing mode, you will see an **Add transition** button there. Clicking it creates a new, unconnected transition that you can configure later.
### Option B -- Drag a Connection
1. Hover over a node until you see a small **handle** (a dot) at the edge of the node.
2. Click and drag from that handle to another node on the canvas.
3. Release the mouse over the target node. A new transition is created and the **Edit Transition** panel opens on the right so you can set the condition.
## Editing a Transition
Click on any transition arrow in the canvas, or click on a numbered transition item inside a node card. The **Edit Transition** panel opens on the right side of the screen.
| Field | Description |
| ---------------- | --------------------------------------------------------------------------------------------------------------------------------------------------------------------------- |
| **Node Name** | A short, descriptive label for this stage of the conversation (for example, "Greeting", "Qualify Lead", "Schedule Demo"). This name appears on the node card in the canvas. |
| **Node Type** | Determines the special behavior of the node. See the table below. |
| **Instructions** | The AI prompt for this stage. Write in plain language what the agent should do, say, or ask when the conversation reaches this node. |
### Node Types
| Type | Purpose |
| ----------------------- | -------------------------------------------------------------------------------------------------------------------------------------------------------------------------------------------------------------------------------------------------------------------------------------------------------------------------------------------------------- |
| **Normal Conversation** | A general-purpose node for dialogue, Q\&A, or any step that does not require built-in contact or scheduling features. |
| **Contact Collection** | Automatically enables contact-information gathering at this node. The agent will prompt the visitor for details such as name, email, and phone number. |
| **Schedule Meeting** | Automatically enables meeting-booking capabilities at this node. The agent can check calendar availability and help the visitor pick a time. |
| **Transfer Call** | A telephony hand-off node (transfer to a phone number, SIP address, or in-app agent). Its settings — destination numbers, bridge/cold transfer, a spoken transfer message — target voice calls; for handing a chat conversation to a human, use the **Human Escalation** toggle instead ([Flow Node Features](/docs/conversational-flow/flow-node-features)). |
4. Click **Create Node**. The new node appears on the canvas and you can drag it to the desired position.
## Understanding Transitions
Transitions are the arrows that connect one node to another. Each transition carries a **condition** -- a plain-language rule that tells the AI when to move the conversation along that path.
For example, a "Greeting" node might have two transitions:
* "If the visitor is a new prospect asking about pricing" -- leads to the "New Prospect Information" node.
* "If the visitor is an existing customer" -- leads to the "Existing Customer Support" node.
The AI reads all available transition conditions at each turn and picks the one that best matches the visitor's latest message. If none match, the conversation stays at the current node.
## Creating a Transition
There are two ways to add a transition:
### Option A -- From the Node Card
Each node card on the canvas displays its existing transitions in the **Transitions** section at the bottom. In editing mode, you will see an **Add transition** button there. Clicking it creates a new, unconnected transition that you can configure later.
### Option B -- Drag a Connection
1. Hover over a node until you see a small **handle** (a dot) at the edge of the node.
2. Click and drag from that handle to another node on the canvas.
3. Release the mouse over the target node. A new transition is created and the **Edit Transition** panel opens on the right so you can set the condition.
## Editing a Transition
Click on any transition arrow in the canvas, or click on a numbered transition item inside a node card. The **Edit Transition** panel opens on the right side of the screen.
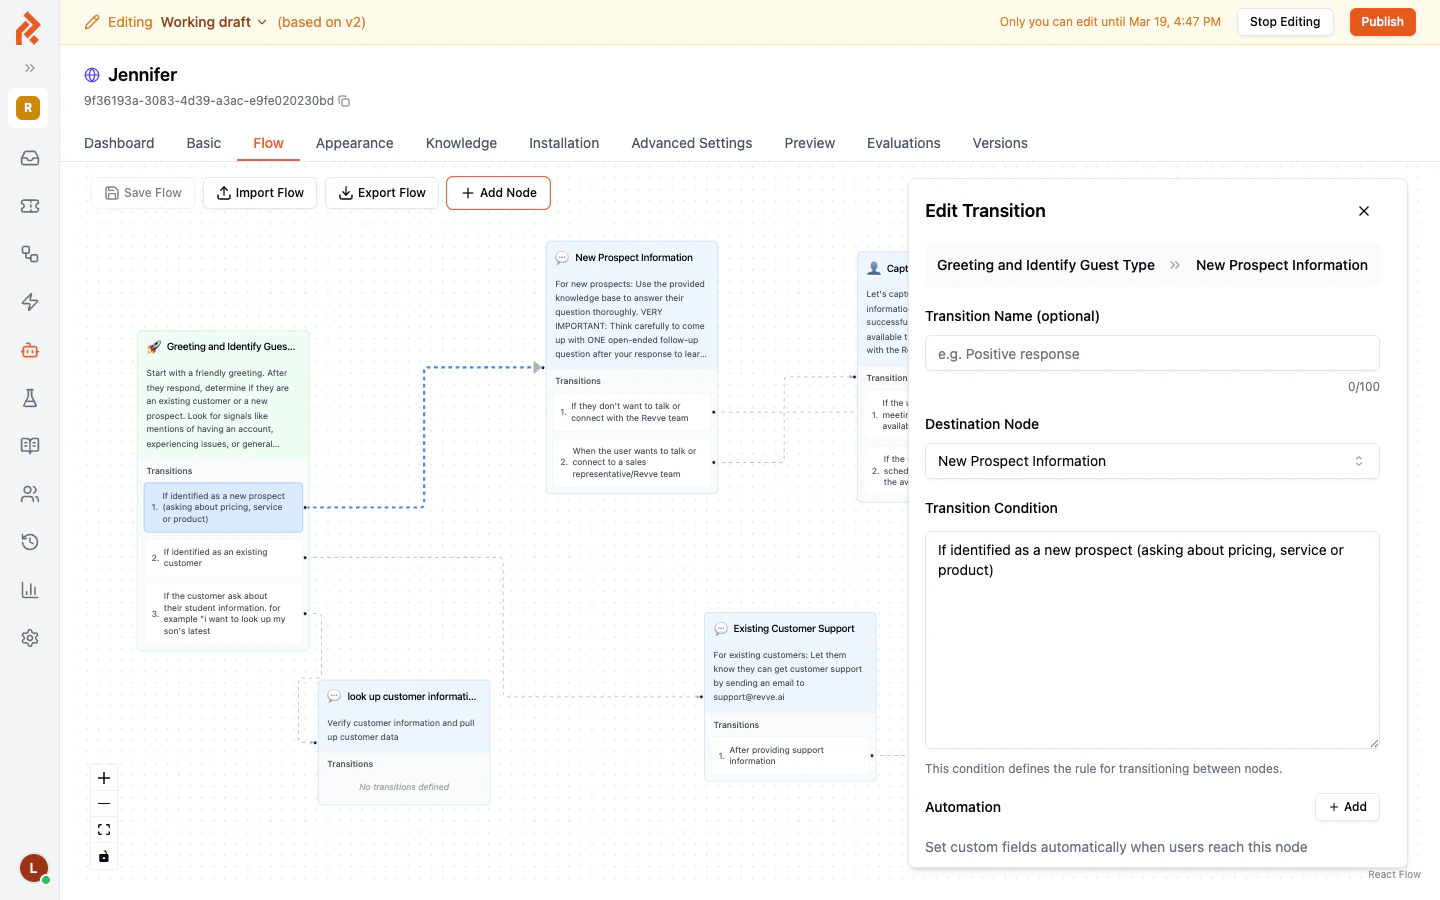 | Field | Description |
| ------------------------------ | ----------------------------------------------------------------------------------------------------------------------------------------------------------------------- |
| **Source and Destination** | Displayed at the top of the panel. Shows which node the transition leaves from and which node it leads to. |
| **Transition Name** (optional) | A short label for your own reference. This name does not affect AI behavior. Maximum 100 characters. |
| **Destination Node** | A dropdown that lets you change the target node this transition leads to. |
| **Transition Condition** | The plain-language rule the AI uses to decide whether to follow this transition. Write it as a clear "if" statement describing the visitor's intent or message content. |
| **Automation** | Optional. Lets you set custom contact fields automatically when this transition is triggered. Click **Add** to configure an automation rule. |
At the bottom of the panel you will find:
| Action | What It Does |
| --------------------- | --------------------------------------------------------------------------------------------------------------- |
| **Disconnect Edge** | Removes the visual arrow but keeps the transition definition on the source node, so you can reconnect it later. |
| **Delete Transition** | Permanently removes the transition and its condition from the flow. |
## Rearranging Nodes
Drag any node to reposition it on the canvas. The transition arrows automatically adjust to follow the new layout. Node positions are saved when you click **Save Flow**.
## Deleting a Node
1. Click on the node to open its configuration panel on the right.
2. Scroll to the bottom and click **Delete Node**.
3. Confirm the deletion when prompted.
Deleting a node also removes all transitions that lead to or from it. Make sure you reassign any critical paths before deleting.
## Best Practices
* **Keep conditions specific and non-overlapping.** If two transitions from the same node have vague or similar conditions, the AI may choose the wrong path. Use clear, distinct criteria for each transition.
* **Always have a fallback path.** Consider adding a transition for cases where the visitor's intent does not match any specific condition (for example, "If the visitor's request does not match any other category").
* **Name your nodes descriptively.** Short, clear names like "Qualify Lead" or "Book Demo" make the flow easy to read at a glance.
* **Test after major changes.** Use the **Preview** tab to walk through your flow as a visitor would, verifying that each transition fires at the right time.
* **Save frequently.** Click **Save Flow** after adding or modifying nodes and transitions to avoid losing work.
## Next Steps
* [Global Nodes and Prompts](/docs/conversational-flow/global-nodes-and-prompts) -- Learn about nodes that can be reached from any point in the conversation.
* [Flow Node Features](/docs/conversational-flow/flow-node-features) -- Explore per-node capabilities like contact collection and meeting scheduling.
| Field | Description |
| ------------------------------ | ----------------------------------------------------------------------------------------------------------------------------------------------------------------------- |
| **Source and Destination** | Displayed at the top of the panel. Shows which node the transition leaves from and which node it leads to. |
| **Transition Name** (optional) | A short label for your own reference. This name does not affect AI behavior. Maximum 100 characters. |
| **Destination Node** | A dropdown that lets you change the target node this transition leads to. |
| **Transition Condition** | The plain-language rule the AI uses to decide whether to follow this transition. Write it as a clear "if" statement describing the visitor's intent or message content. |
| **Automation** | Optional. Lets you set custom contact fields automatically when this transition is triggered. Click **Add** to configure an automation rule. |
At the bottom of the panel you will find:
| Action | What It Does |
| --------------------- | --------------------------------------------------------------------------------------------------------------- |
| **Disconnect Edge** | Removes the visual arrow but keeps the transition definition on the source node, so you can reconnect it later. |
| **Delete Transition** | Permanently removes the transition and its condition from the flow. |
## Rearranging Nodes
Drag any node to reposition it on the canvas. The transition arrows automatically adjust to follow the new layout. Node positions are saved when you click **Save Flow**.
## Deleting a Node
1. Click on the node to open its configuration panel on the right.
2. Scroll to the bottom and click **Delete Node**.
3. Confirm the deletion when prompted.
Deleting a node also removes all transitions that lead to or from it. Make sure you reassign any critical paths before deleting.
## Best Practices
* **Keep conditions specific and non-overlapping.** If two transitions from the same node have vague or similar conditions, the AI may choose the wrong path. Use clear, distinct criteria for each transition.
* **Always have a fallback path.** Consider adding a transition for cases where the visitor's intent does not match any specific condition (for example, "If the visitor's request does not match any other category").
* **Name your nodes descriptively.** Short, clear names like "Qualify Lead" or "Book Demo" make the flow easy to read at a glance.
* **Test after major changes.** Use the **Preview** tab to walk through your flow as a visitor would, verifying that each transition fires at the right time.
* **Save frequently.** Click **Save Flow** after adding or modifying nodes and transitions to avoid losing work.
## Next Steps
* [Global Nodes and Prompts](/docs/conversational-flow/global-nodes-and-prompts) -- Learn about nodes that can be reached from any point in the conversation.
* [Flow Node Features](/docs/conversational-flow/flow-node-features) -- Explore per-node capabilities like contact collection and meeting scheduling.