> ## Documentation Index
> Fetch the complete documentation index at: https://www.revve.ai/docs/llms.txt
> Use this file to discover all available pages before exploring further.
# Creating a Campaign
> Step-by-step: create a campaign, configure agents and engagement flow, publish it, enroll contacts, and monitor results.
This guide builds a complete outbound campaign. Before starting, make sure you have at least one published agent to attach — for calling campaigns, a [Voice Agent](/docs/voice-agents/creating-your-first-voice-agent); for messaging, a Chat Agent on the relevant channel.
## Step 1: Create the campaign
Go to **Campaigns** in the left sidebar and click **New Campaign**. Give it a **Name** (max 50 characters) and a short **Description**, then click **Create**.
## Step 2: Start editing
You land on the **Setup** tab in read-only mode. Click **Start Editing** in the top banner to open a working draft:
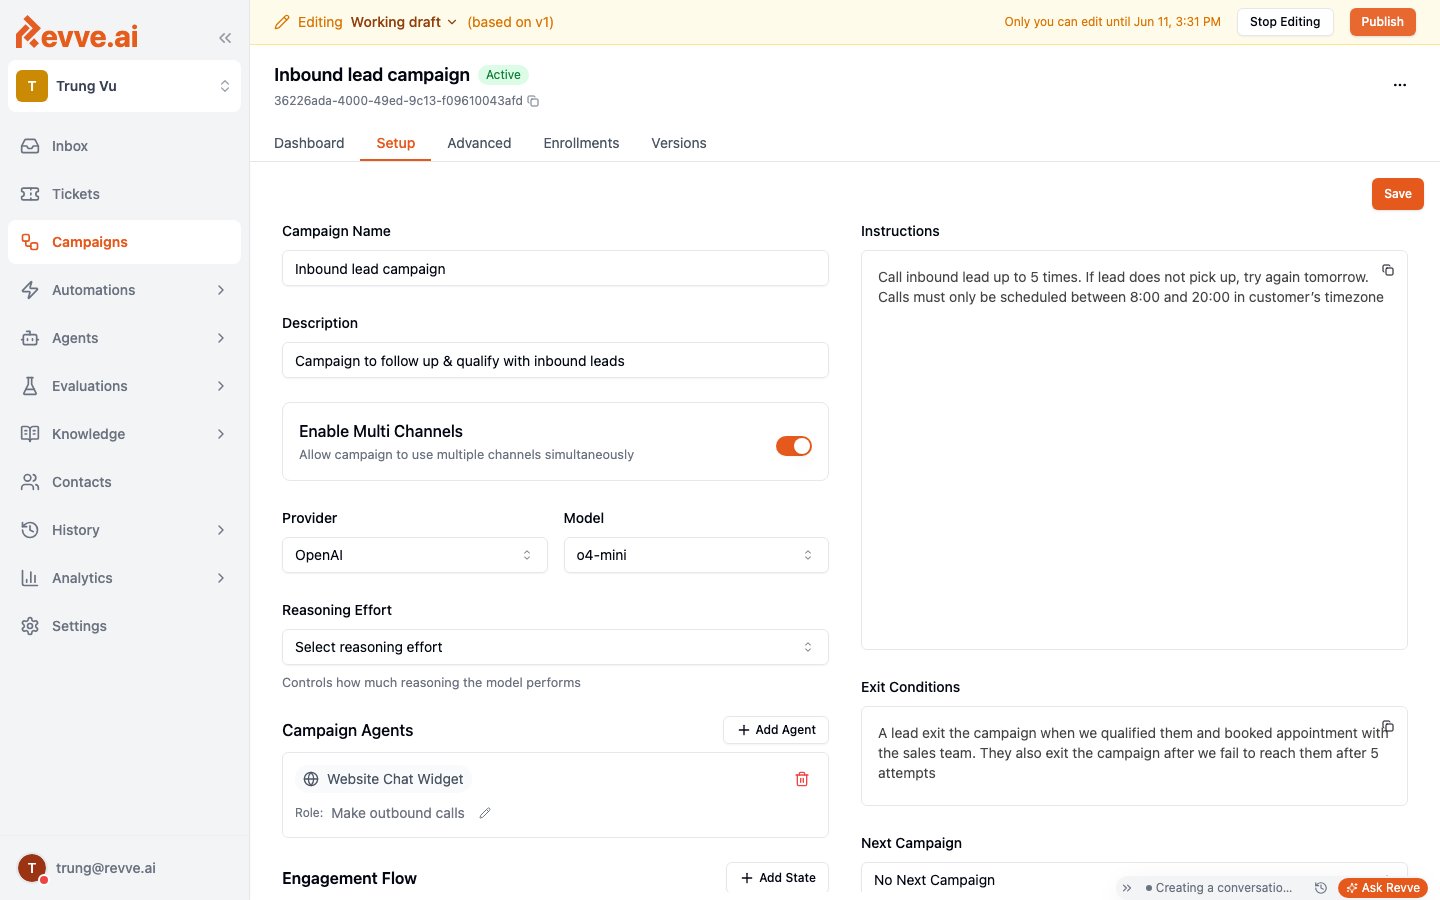 **Only one person edits at a time.** Starting to edit locks the draft for you (the banner shows until when). Teammates see "Locked for edit" until you click **Stop Editing** or the lock expires. The live campaign — if already published — keeps running untouched while you edit.
## Step 3: Configure the Setup tab
Work down the form:
| Field | What to put there |
| ------------------------------- | --------------------------------------------------------------------------------------------------------------------------------------------------------------------------------------------------------------------------- |
| **Campaign Name / Description** | Refine if needed. |
| **Enable Multi Channels** | On = the AI may combine channels for one contact (call, then SMS follow-up). Off = it sticks to one channel. Turn it on when you've attached agents on more than one channel. |
| **Provider / Model** | The AI model making the campaign's decisions (which action, when). A reasoning-capable model is a good fit here — decisions are infrequent but consequential. Models with a **Reasoning Effort** option show that selector. |
### Campaign Agents
Click **+ Add Agent** and attach each agent the campaign should act through. For each one, set its **Role** — what this agent's job is within the campaign (e.g. "Make outbound qualification calls"). The agent's channel determines what the campaign can do: a voice agent enables phone calls, an SMS chat agent enables texting, and so on.
### Engagement Flow
Define the states a contact moves through with **+ Add State**. Keep it simple — three to five states is typical:
```
not_responded_yet → contacted → qualified → booked_meeting
```
Give each state a short description; the AI uses them to judge which state a contact is in after each interaction.
### Instructions
Plain-language rules for how the AI runs the campaign. Be concrete about attempts, timing, and tone:
> Call inbound leads up to 5 times. If the lead does not pick up, try again tomorrow. Calls must only be scheduled between 8:00 and 20:00 in the customer's timezone.
### Exit Conditions
When is a contact *done*? Cover both success and failure:
> A lead exits the campaign when we qualified them and booked an appointment with the sales team. They also exit after we fail to reach them after 5 attempts.
### Next Campaign (optional)
Send exiting contacts straight into another campaign — e.g. unreached leads into a slower nurture campaign.
The **Advanced** tab lets you add a **prehook** — an HTTP request the campaign makes before each AI decision, to check eligibility against your own systems (e.g. "has this lead already converted in our CRM?") and exit contacts automatically. Most campaigns don't need one to start.
## Step 4: Publish
Campaign changes only take effect when published. From the draft banner:
* **Publish** (if you have the Publish Campaigns permission) — review the change summary, optionally add a publish note, and confirm.
* **Submit for Review** (if you don't) — pick reviewers, add a description, and submit. A reviewer approves (which publishes) or declines (your draft stays for rework).
If the campaign already has contacts in flight, you'll see an **upgrade in-flight enrollments** option at publish time:
* **Unchecked (default):** contacts already enrolled finish on the version they started with; only new enrollments get the new version. The safe choice.
* **Checked:** everyone moves to the new version immediately. Use when you're fixing something wrong, not just improving wording.
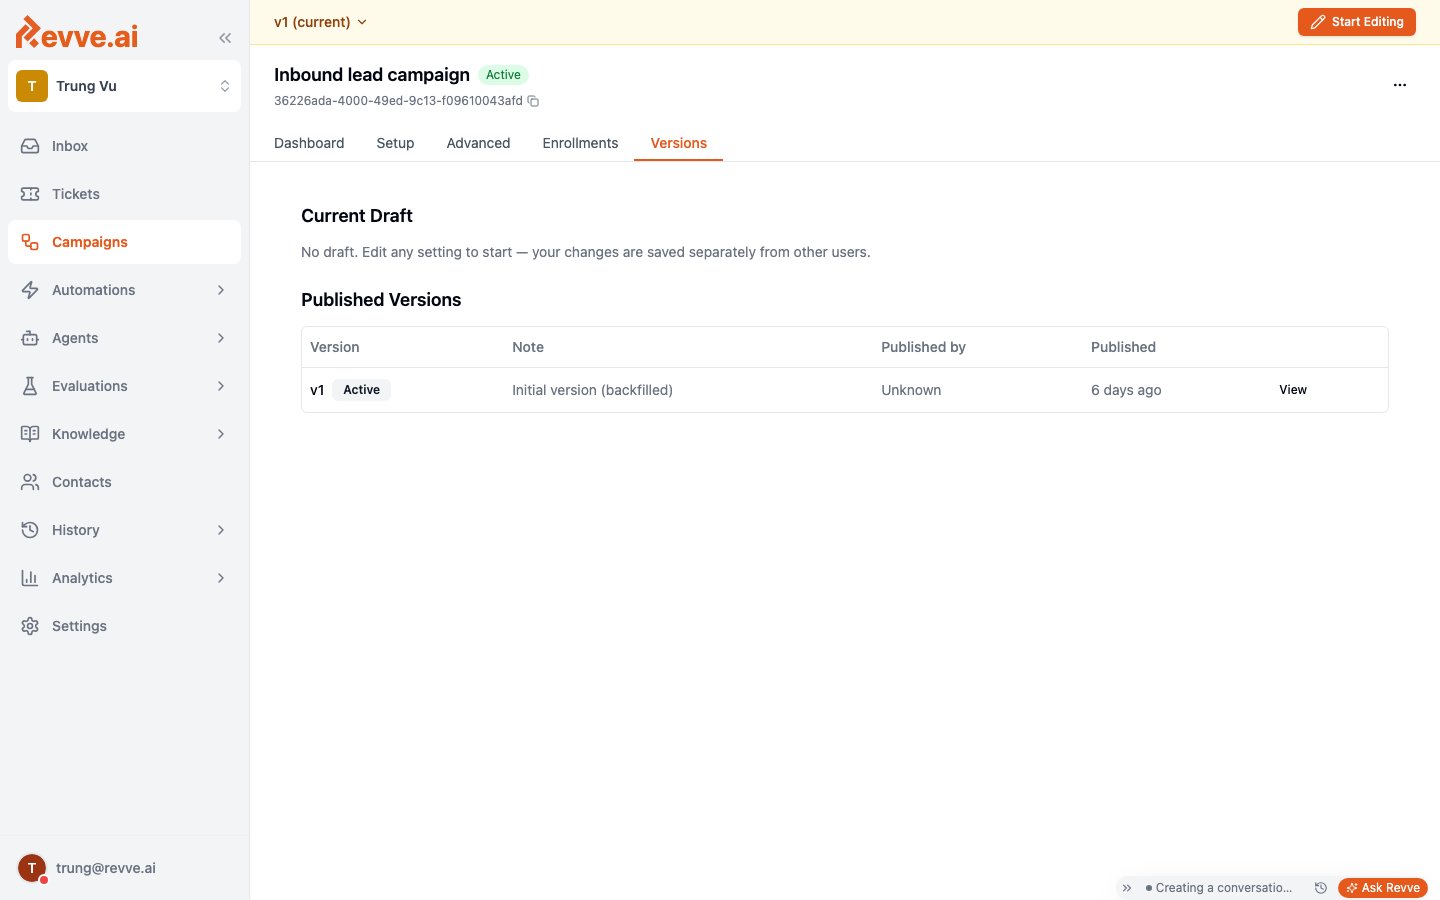
Every publish appears in the **Versions** tab — who published, when, with what note — and you can view any historical version read-only:
**Only one person edits at a time.** Starting to edit locks the draft for you (the banner shows until when). Teammates see "Locked for edit" until you click **Stop Editing** or the lock expires. The live campaign — if already published — keeps running untouched while you edit.
## Step 3: Configure the Setup tab
Work down the form:
| Field | What to put there |
| ------------------------------- | --------------------------------------------------------------------------------------------------------------------------------------------------------------------------------------------------------------------------- |
| **Campaign Name / Description** | Refine if needed. |
| **Enable Multi Channels** | On = the AI may combine channels for one contact (call, then SMS follow-up). Off = it sticks to one channel. Turn it on when you've attached agents on more than one channel. |
| **Provider / Model** | The AI model making the campaign's decisions (which action, when). A reasoning-capable model is a good fit here — decisions are infrequent but consequential. Models with a **Reasoning Effort** option show that selector. |
### Campaign Agents
Click **+ Add Agent** and attach each agent the campaign should act through. For each one, set its **Role** — what this agent's job is within the campaign (e.g. "Make outbound qualification calls"). The agent's channel determines what the campaign can do: a voice agent enables phone calls, an SMS chat agent enables texting, and so on.
### Engagement Flow
Define the states a contact moves through with **+ Add State**. Keep it simple — three to five states is typical:
```
not_responded_yet → contacted → qualified → booked_meeting
```
Give each state a short description; the AI uses them to judge which state a contact is in after each interaction.
### Instructions
Plain-language rules for how the AI runs the campaign. Be concrete about attempts, timing, and tone:
> Call inbound leads up to 5 times. If the lead does not pick up, try again tomorrow. Calls must only be scheduled between 8:00 and 20:00 in the customer's timezone.
### Exit Conditions
When is a contact *done*? Cover both success and failure:
> A lead exits the campaign when we qualified them and booked an appointment with the sales team. They also exit after we fail to reach them after 5 attempts.
### Next Campaign (optional)
Send exiting contacts straight into another campaign — e.g. unreached leads into a slower nurture campaign.
The **Advanced** tab lets you add a **prehook** — an HTTP request the campaign makes before each AI decision, to check eligibility against your own systems (e.g. "has this lead already converted in our CRM?") and exit contacts automatically. Most campaigns don't need one to start.
## Step 4: Publish
Campaign changes only take effect when published. From the draft banner:
* **Publish** (if you have the Publish Campaigns permission) — review the change summary, optionally add a publish note, and confirm.
* **Submit for Review** (if you don't) — pick reviewers, add a description, and submit. A reviewer approves (which publishes) or declines (your draft stays for rework).
If the campaign already has contacts in flight, you'll see an **upgrade in-flight enrollments** option at publish time:
* **Unchecked (default):** contacts already enrolled finish on the version they started with; only new enrollments get the new version. The safe choice.
* **Checked:** everyone moves to the new version immediately. Use when you're fixing something wrong, not just improving wording.
Every publish appears in the **Versions** tab — who published, when, with what note — and you can view any historical version read-only:
 ## Step 5: Enroll contacts
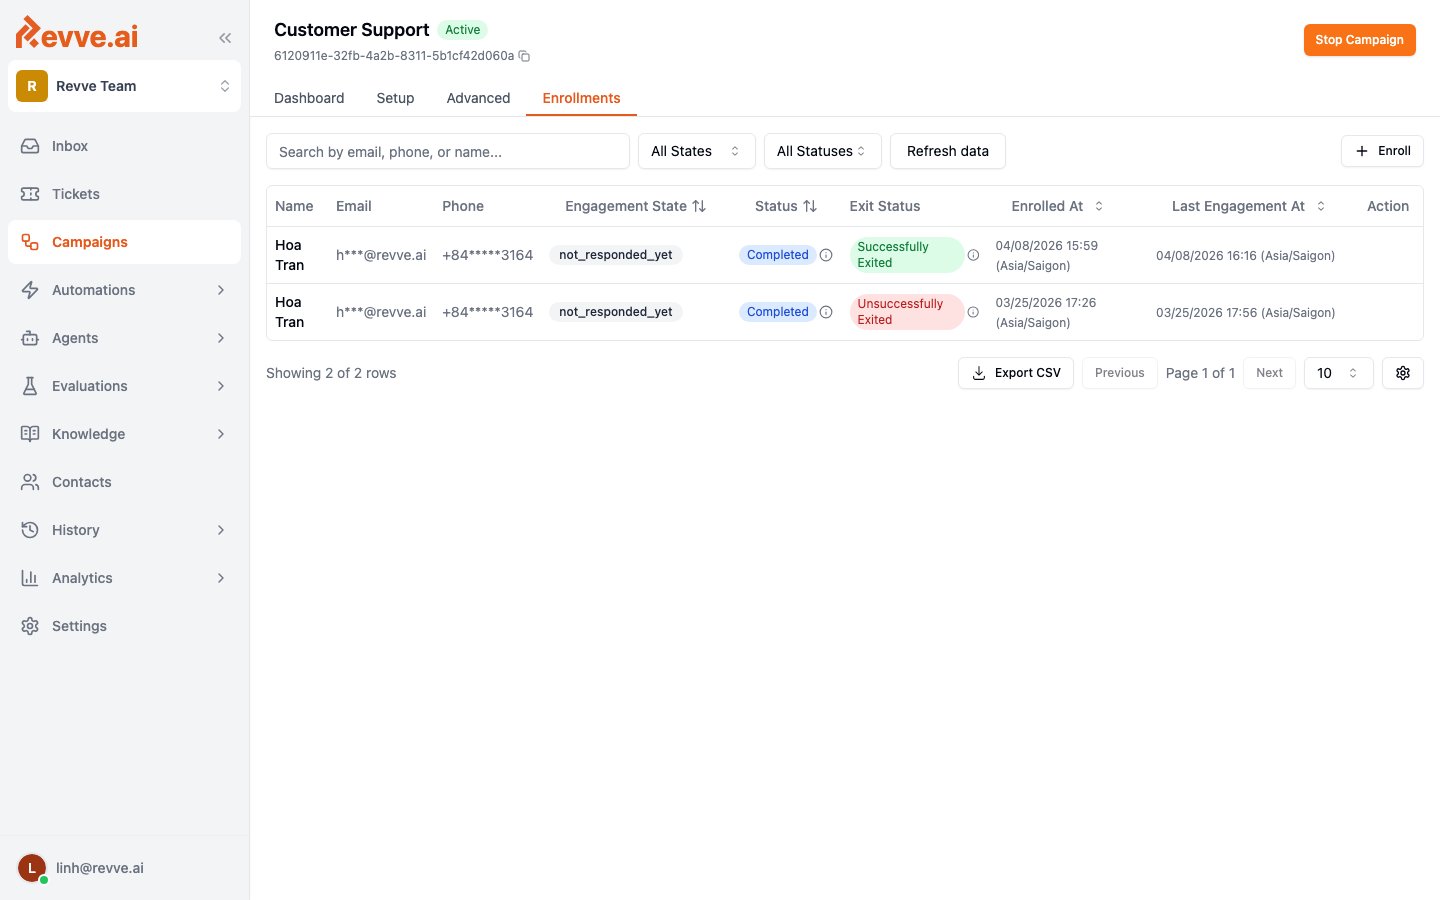
Open the **Enrollments** tab and click **+ Enroll**:
## Step 5: Enroll contacts
Open the **Enrollments** tab and click **+ Enroll**:
 **CSV import** — for lists. Upload the file, map columns to contact fields (auto-detected; **Phone Number is required**), preview the first rows, and choose timing:
* **Immediate** — everyone enters the campaign now.
* **Scheduled** — staggered batches (e.g. 20 contacts per 24 hours). Use this for large lists so your agents — and your audience — aren't hit all at once.
**One at a time** — add a single contact manually. Do this first: **enroll yourself before any real contacts** and experience the campaign as a lead would.
**Via API** — for continuous enrollment from your website or CRM (the speed-to-lead pattern):
```bash theme={null}
curl -X POST https://app.revve.ai/api/campaigns/enrollments \
-H "Authorization: Bearer YOUR_API_KEY" \
-H "Content-Type: application/json" \
-d '{
"contactId": "CONTACT_UUID",
"teamId": "TEAM_UUID",
"campaignId": "CAMPAIGN_UUID"
}'
```
Returns `200` with an `enrollmentId`, or `409` if the contact is already enrolled. API keys live in **Settings**.
If the contact doesn't exist in Revve yet — e.g. it's coming straight from your core system or CRM — use `contact-enrollments` instead, which creates the contact and enrolls it in one call:
```bash theme={null}
curl -X POST https://app.revve.ai/api/campaigns/contact-enrollments \
-H "Authorization: Bearer YOUR_API_KEY" \
-H "Content-Type: application/json" \
-d '{
"teamId": "TEAM_UUID",
"campaignId": "CAMPAIGN_UUID",
"phoneNumber": "+84775352590",
"name": "Jane Doe",
"email": "jane@example.com"
}'
```
`phoneNumber` and `teamId` are required; `campaignId` is optional (omit it to just create/update the contact without enrolling). Returns `200` with a `contactId`.
### Managing enrollments
Once contacts are enrolled, the same **Enrollments** table (shown above) is where you manage them while they're in flight — per-row actions, filters, and CSV export.
**Row actions.** Each row's **Action** column shows buttons only while the enrollment is **active** or **paused** — they disappear once it's **completed**:
* **Engage** opens a **Create New Engagement** dialog. This doesn't trigger "the AI's next move" — it's a manual form for creating one specific outreach action on this one enrollment. Pick an agent, a channel (phone call, SMS, email, or WhatsApp), execution timing (immediate, or scheduled with a time and a response deadline), and channel-specific content (a template, or a subject and message). On submit, a **paused** enrollment reactivates to **active**; an immediate action runs right away, a scheduled one is queued for its time. Use it when a rep wants to personally nudge one lead outside the campaign's normal cadence.
* **Exit** opens an **Exit Campaign** dialog and is styled as a destructive action. It requires an **Exit Status** (**Successfully exit** or **Non-Successfully exit**) and a **Reason** (free text, at least 10 characters). Clicking **Confirm Exit** *is* the confirmation — there's no further "are you sure" step. It takes effect immediately: the enrollment moves to **completed**, the exit type and reason are recorded, and any other pending actions for that enrollment are cancelled. Treat Exit as final, not a draft — there's no undo for it in the UI.
Click anywhere else on a row to open the enrollment detail panel with its full engagement timeline. A column-visibility toggle above the table lets you show or hide columns, including custom contact fields.
**Filters.** The toolbar above the table narrows what you see:
| Filter | Behavior |
| -------------- | ------------------------------------------------------------------------------------------------------------------------------------------------------------------------------------------------------------------------------------- |
| **Search** | Matches by email, phone, or name. |
| **State** | Populated from this campaign's own engagement flow states (set on the Setup tab); defaults to **All States**. |
| **Status** | Fixed options: All Statuses, Active, Completed, Paused. |
| **Date range** | Filters by **Enrolled At** (when the contact entered the campaign); defaults to the last month. It's skipped automatically while a search term is active, so a search can still surface older matches outside the visible date range. |
Filters, sort, pagination, and column visibility are all reflected in the URL, so a filtered view is a link you can share with a teammate as-is.
**CSV export.** The **Export CSV** button offers two options:
* **Export Current Page** — just the rows currently displayed.
* **Export All Data** — every row matching the active filters, not the whole table.
Both export the same columns: Name, Email, Phone, Company, Engagement State, Status, Exit Status, Enrolled At, Last Engagement At, Contact ID, Enrollment ID. Custom contact fields you've toggled on for on-screen viewing aren't included in the export.
## Step 6: Monitor
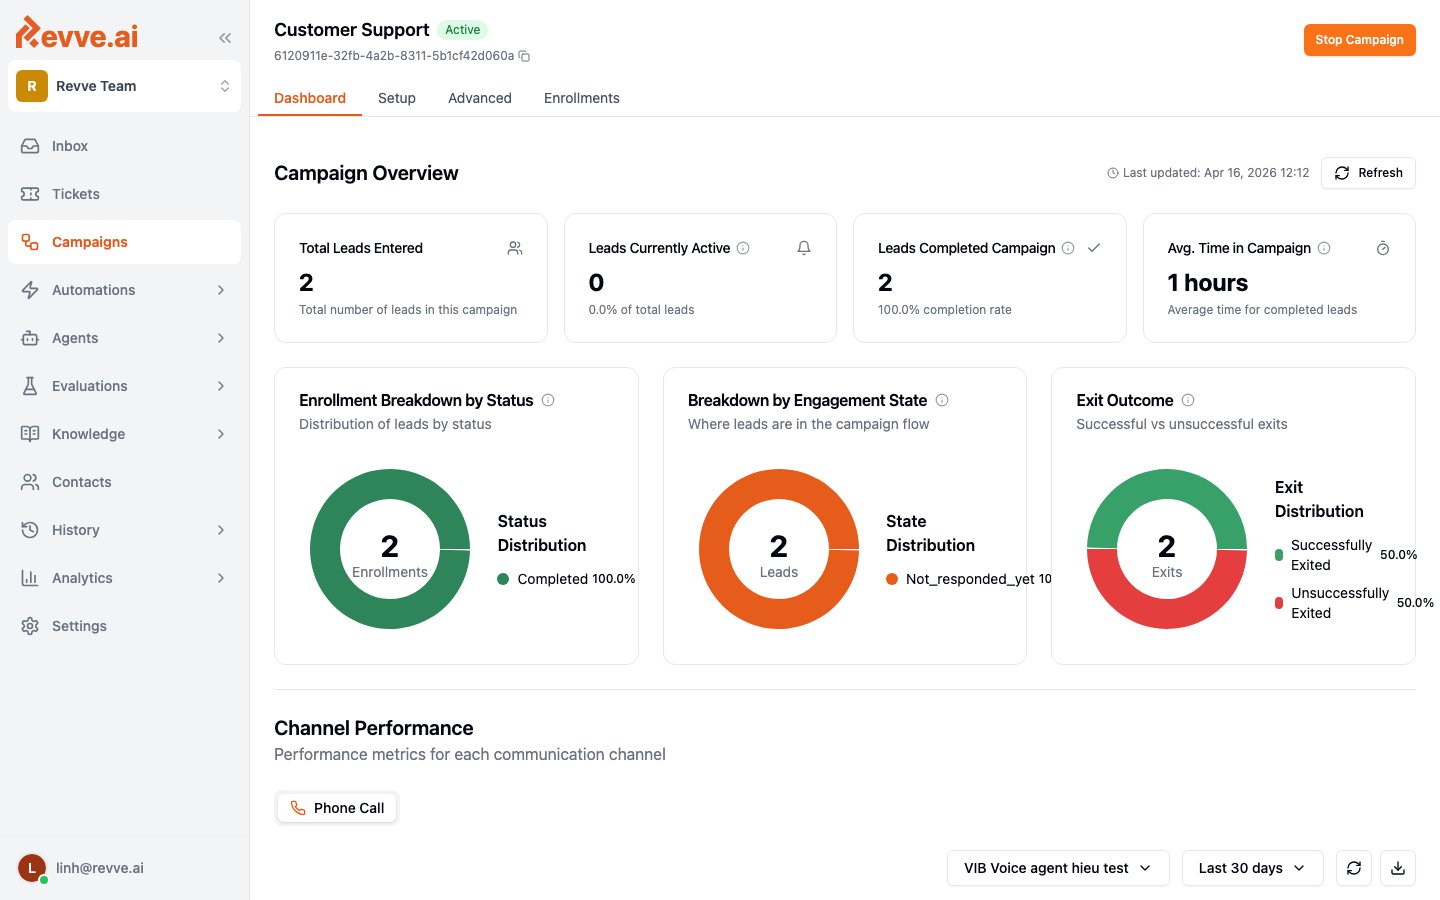
The **Dashboard** tab answers "is it working?" at a glance — total, active, and completed leads, average time in campaign, and breakdowns by status, engagement state, and exit outcome, plus per-channel performance:
**CSV import** — for lists. Upload the file, map columns to contact fields (auto-detected; **Phone Number is required**), preview the first rows, and choose timing:
* **Immediate** — everyone enters the campaign now.
* **Scheduled** — staggered batches (e.g. 20 contacts per 24 hours). Use this for large lists so your agents — and your audience — aren't hit all at once.
**One at a time** — add a single contact manually. Do this first: **enroll yourself before any real contacts** and experience the campaign as a lead would.
**Via API** — for continuous enrollment from your website or CRM (the speed-to-lead pattern):
```bash theme={null}
curl -X POST https://app.revve.ai/api/campaigns/enrollments \
-H "Authorization: Bearer YOUR_API_KEY" \
-H "Content-Type: application/json" \
-d '{
"contactId": "CONTACT_UUID",
"teamId": "TEAM_UUID",
"campaignId": "CAMPAIGN_UUID"
}'
```
Returns `200` with an `enrollmentId`, or `409` if the contact is already enrolled. API keys live in **Settings**.
If the contact doesn't exist in Revve yet — e.g. it's coming straight from your core system or CRM — use `contact-enrollments` instead, which creates the contact and enrolls it in one call:
```bash theme={null}
curl -X POST https://app.revve.ai/api/campaigns/contact-enrollments \
-H "Authorization: Bearer YOUR_API_KEY" \
-H "Content-Type: application/json" \
-d '{
"teamId": "TEAM_UUID",
"campaignId": "CAMPAIGN_UUID",
"phoneNumber": "+84775352590",
"name": "Jane Doe",
"email": "jane@example.com"
}'
```
`phoneNumber` and `teamId` are required; `campaignId` is optional (omit it to just create/update the contact without enrolling). Returns `200` with a `contactId`.
### Managing enrollments
Once contacts are enrolled, the same **Enrollments** table (shown above) is where you manage them while they're in flight — per-row actions, filters, and CSV export.
**Row actions.** Each row's **Action** column shows buttons only while the enrollment is **active** or **paused** — they disappear once it's **completed**:
* **Engage** opens a **Create New Engagement** dialog. This doesn't trigger "the AI's next move" — it's a manual form for creating one specific outreach action on this one enrollment. Pick an agent, a channel (phone call, SMS, email, or WhatsApp), execution timing (immediate, or scheduled with a time and a response deadline), and channel-specific content (a template, or a subject and message). On submit, a **paused** enrollment reactivates to **active**; an immediate action runs right away, a scheduled one is queued for its time. Use it when a rep wants to personally nudge one lead outside the campaign's normal cadence.
* **Exit** opens an **Exit Campaign** dialog and is styled as a destructive action. It requires an **Exit Status** (**Successfully exit** or **Non-Successfully exit**) and a **Reason** (free text, at least 10 characters). Clicking **Confirm Exit** *is* the confirmation — there's no further "are you sure" step. It takes effect immediately: the enrollment moves to **completed**, the exit type and reason are recorded, and any other pending actions for that enrollment are cancelled. Treat Exit as final, not a draft — there's no undo for it in the UI.
Click anywhere else on a row to open the enrollment detail panel with its full engagement timeline. A column-visibility toggle above the table lets you show or hide columns, including custom contact fields.
**Filters.** The toolbar above the table narrows what you see:
| Filter | Behavior |
| -------------- | ------------------------------------------------------------------------------------------------------------------------------------------------------------------------------------------------------------------------------------- |
| **Search** | Matches by email, phone, or name. |
| **State** | Populated from this campaign's own engagement flow states (set on the Setup tab); defaults to **All States**. |
| **Status** | Fixed options: All Statuses, Active, Completed, Paused. |
| **Date range** | Filters by **Enrolled At** (when the contact entered the campaign); defaults to the last month. It's skipped automatically while a search term is active, so a search can still surface older matches outside the visible date range. |
Filters, sort, pagination, and column visibility are all reflected in the URL, so a filtered view is a link you can share with a teammate as-is.
**CSV export.** The **Export CSV** button offers two options:
* **Export Current Page** — just the rows currently displayed.
* **Export All Data** — every row matching the active filters, not the whole table.
Both export the same columns: Name, Email, Phone, Company, Engagement State, Status, Exit Status, Enrolled At, Last Engagement At, Contact ID, Enrollment ID. Custom contact fields you've toggled on for on-screen viewing aren't included in the export.
## Step 6: Monitor
The **Dashboard** tab answers "is it working?" at a glance — total, active, and completed leads, average time in campaign, and breakdowns by status, engagement state, and exit outcome, plus per-channel performance:
 For "what exactly happened with this contact?", click their row in **Enrollments** to see the full engagement timeline — every call, message, reply, and AI decision. Replies also land in your [Inbox](/docs/inbox/inbox-overview) as normal conversations.
To pause everything, open the **⋯ (More actions)** menu in the top-right and choose **Stop Campaign**. Confirm in the dialog ("Stop this campaign? Ongoing and scheduled sends will be paused.") with **Yes, stop it**. There's no self-service way to reactivate a stopped campaign from the UI — contact your Revve team to bring it back.
## Pre-launch checklist
* [ ] Agents attached are **published** and tested (voice agents: make a Preview call).
* [ ] Instructions state max attempts and allowed calling hours.
* [ ] Exit conditions cover failure ("after N attempts"), not just success.
* [ ] You enrolled yourself first and the experience felt right.
* [ ] Large list? Enrollment is **Scheduled**, not Immediate.
* [ ] Numbers on your team's [Do Not Call List](/docs/voice-agents/do-not-call-list) don't need to be filtered out of your CSV by hand — a matching call step is skipped automatically.
## What's Next
* [What Is a Campaign?](/docs/campaigns/campaign-overview) — concepts and use-case patterns.
* [Voice Agent Settings](/docs/voice-agents/voice-agent-settings) — tune voicemail and retry behavior for calling campaigns.
* [Build a Payment Reminder Campaign](/docs/guides/payment-reminder-campaign) — a full voice-then-SMS recipe applying these steps to a concrete scenario.
For "what exactly happened with this contact?", click their row in **Enrollments** to see the full engagement timeline — every call, message, reply, and AI decision. Replies also land in your [Inbox](/docs/inbox/inbox-overview) as normal conversations.
To pause everything, open the **⋯ (More actions)** menu in the top-right and choose **Stop Campaign**. Confirm in the dialog ("Stop this campaign? Ongoing and scheduled sends will be paused.") with **Yes, stop it**. There's no self-service way to reactivate a stopped campaign from the UI — contact your Revve team to bring it back.
## Pre-launch checklist
* [ ] Agents attached are **published** and tested (voice agents: make a Preview call).
* [ ] Instructions state max attempts and allowed calling hours.
* [ ] Exit conditions cover failure ("after N attempts"), not just success.
* [ ] You enrolled yourself first and the experience felt right.
* [ ] Large list? Enrollment is **Scheduled**, not Immediate.
* [ ] Numbers on your team's [Do Not Call List](/docs/voice-agents/do-not-call-list) don't need to be filtered out of your CSV by hand — a matching call step is skipped automatically.
## What's Next
* [What Is a Campaign?](/docs/campaigns/campaign-overview) — concepts and use-case patterns.
* [Voice Agent Settings](/docs/voice-agents/voice-agent-settings) — tune voicemail and retry behavior for calling campaigns.
* [Build a Payment Reminder Campaign](/docs/guides/payment-reminder-campaign) — a full voice-then-SMS recipe applying these steps to a concrete scenario.